Fruit Leather Art – Homemade Fruit Roll-Ups Kids Can Decorate
This post may contain affiliate links.
Homemade Fruit leather art?! This fun twist on homemade fruit roll-ups turns a simple healthy snack into a creative kitchen activity kids absolutely love.
Instead of just pouring blended fruit and drying it, kids can swirl, doodle, and design their own edible artwork before it goes into the dehydrator. It’s part snack, part art project—and completely delicious.
Fruit leather is a favorite snack at our house. Every summer I make a whole bunch!

What Is Fruit Leather Art?
Fruit leather art is a creative version of homemade fruit roll-ups where kids decorate the fruit mixture with fun designs before drying.
Why kids love it:
- Hands-on and creative
- Feels like art + food combined
- Totally customizable
Best for:
- Summer snacks
- Kitchen science activities
- Healthy treat alternatives

How to Make Fruit Leather Art
Ingredients
- Fresh nectarines (or fruit of choice)
- ½ cup unsweetened applesauce
- Blueberries (or another contrasting fruit)

Step 1: Blend the Base Fruit
Start with a lighter-colored fruit so your designs show up clearly.
We used fresh nectarines and blended them with about ½ cup of unsweetened applesauce. This adds a touch of natural sweetness and helps create a smooth texture.
You can also use:
- Strawberries
- Apricots
- Apples
- Plums
- Cherries
Step 2: Spread the Fruit Mixture
Pour the blended fruit onto your fruit leather trays and spread it evenly.
We use a dehydrator with fruit leather trays, but you can also make this in the oven using:
- Parchment paper
- Silicone baking mats
Set your oven to the lowest temperature possible.

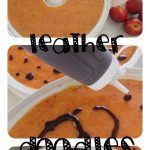
Step 3: Make the Design Mixture
Blend about 1 to 1½ cups of blueberries or other contrasting fruit (fresh or frozen). If using frozen, thaw them first and include the juice—it helps them blend smoothly.
Pour the mixture into a squeeze bottle (you can find these inexpensive bottles at most stores).

Step 4: Create Your Fruit Leather Art
Now comes the fun part!
Use the squeeze bottle to draw directly onto the fruit layer. Try:
- Swirls
- Polka dots
- Lines
- Shapes
- Names or simple pictures
Kids LOVE this step—it feels like edible art.
Step 5: Dry the Fruit Leather
- Dehydrator: about 8–12 hours
- Oven: 6–8 hours on the lowest setting
Dry until the fruit leather is no longer sticky to the touch.

What Happens When It Dries?
As the fruit leather dries, the colors may soften or spread slightly, but your designs will still show through beautifully—and everything holds together as one piece.
The Science Behind Fruit Leather
Fruit leather works because of the natural sugars and pectin found in fruit.
As it dries:
- Water evaporates
- Sugars concentrate
- Pectin helps create that flexible, chewy texture
The different fruit layers dry together, which is why your designs don’t separate.
This makes it a perfect mix of kitchen science and creative fun!
Fun Fruit Leather Art Ideas
Try different color combinations for even more creativity:
- Mango + raspberry
- Apple + strawberry
- Peach + blackberry
- Banana + blueberry
You can also:
- Make rainbow fruit leather
- Create patterns or pictures
- Let kids design their own “snack masterpieces”
These homemade fruit roll-ups are a fun alternative to store-bought fruit snacks and can be customized with any fruit combinations you like.
Why We Love This Activity
This is such a simple way to turn a healthy snack into something creative and memorable.
If your kids already love fruit snacks, this is a fun way to make your own—with real ingredients—and add a little creativity along the way.
See more kid-friendly recipes:
3 Ingredient Homemade Pixie Sticks with Real Fruit!