STEM Project- Build a Hydraulic Elevator
This post may contain affiliate links.
I have been wanting to try a hydraulic elevator STEM project for a while now and finally found the perfect way to do it!
We first explored hydraulics through one of our Tinker Crates when we made a hydraulic hand.
It was so much fun that the kids immediately wanted to try more projects like it!
See more of my book activities for kids posts and more STEM Projects for Kids
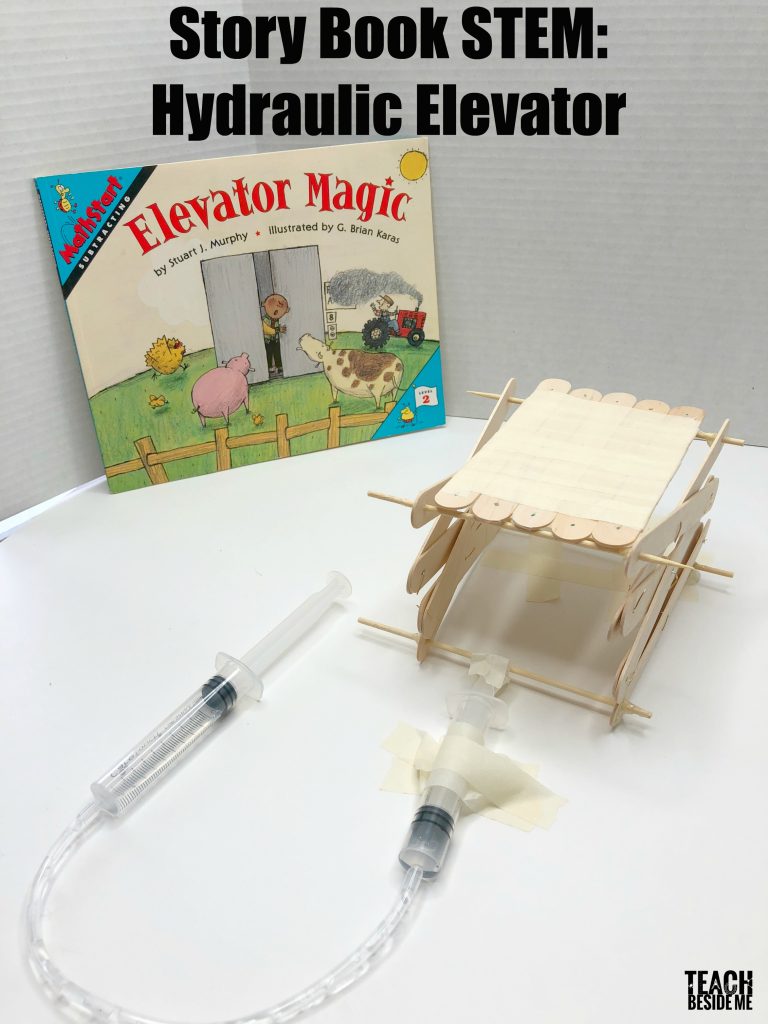
This hydraulic elevator project was designed to pair with the book Elevator Magic by Stuart J. Murphy — a fun math picture book focused on subtraction.
This STEM activity combines both engineering and math in an exciting, hands-on way!

How to Make the Hydraulic Elevator
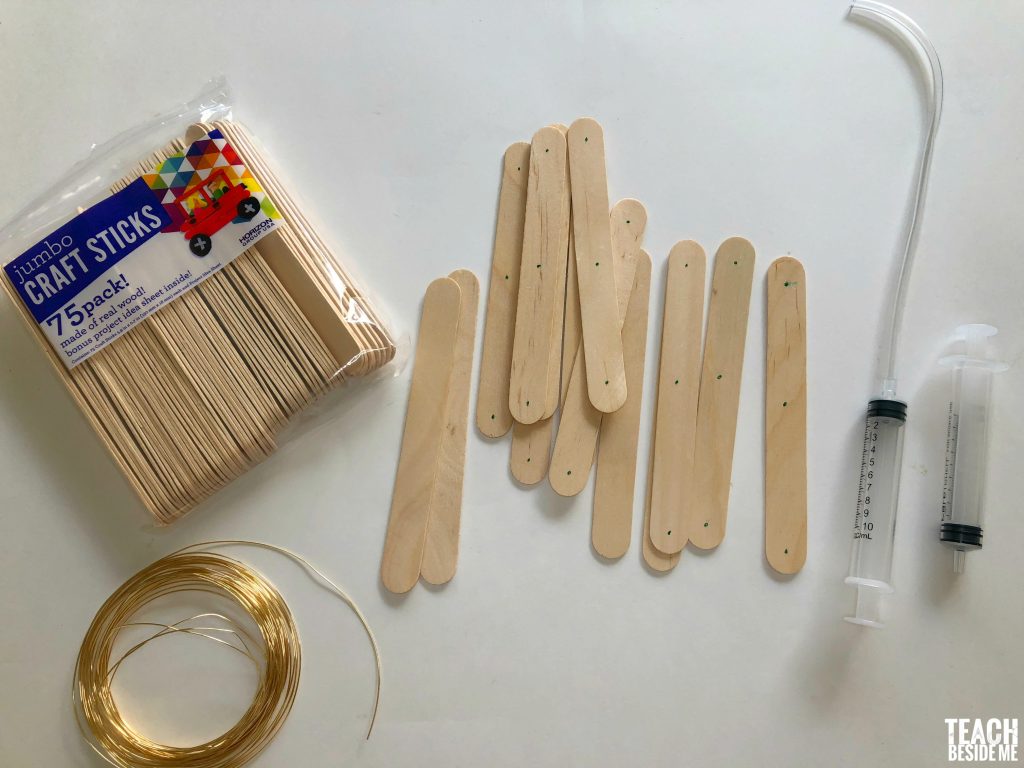
Supplies for the Hydraulic Elevator:
Jumbo Popsicle Sticks (17)
Thin wire
Wooden Skewers (2)
2 – 10 ml Syringes
Thin plastic tubing
Hot glue gun
Masking tape
Step-by-Step Instructions:
Prepare the popsicle sticks:
- Mark three points on each stick: center and about ½ inch from each end.
- Stack the sticks together and tape them into a bundle.
- Carefully drill small holes through all the marked points (a screwdriver also works if you don’t have a drill, but takes longer).
(Tip: Popsicle sticks can split easily — work slowly and carefully!)

Create scissor mechanisms:
-
Connect the center points of two sticks together using a small piece of wire.
-
Repeat until you have three sets of paired sticks.
-
Connect the ends of each pair to form a row of three overlapping X-shapes.

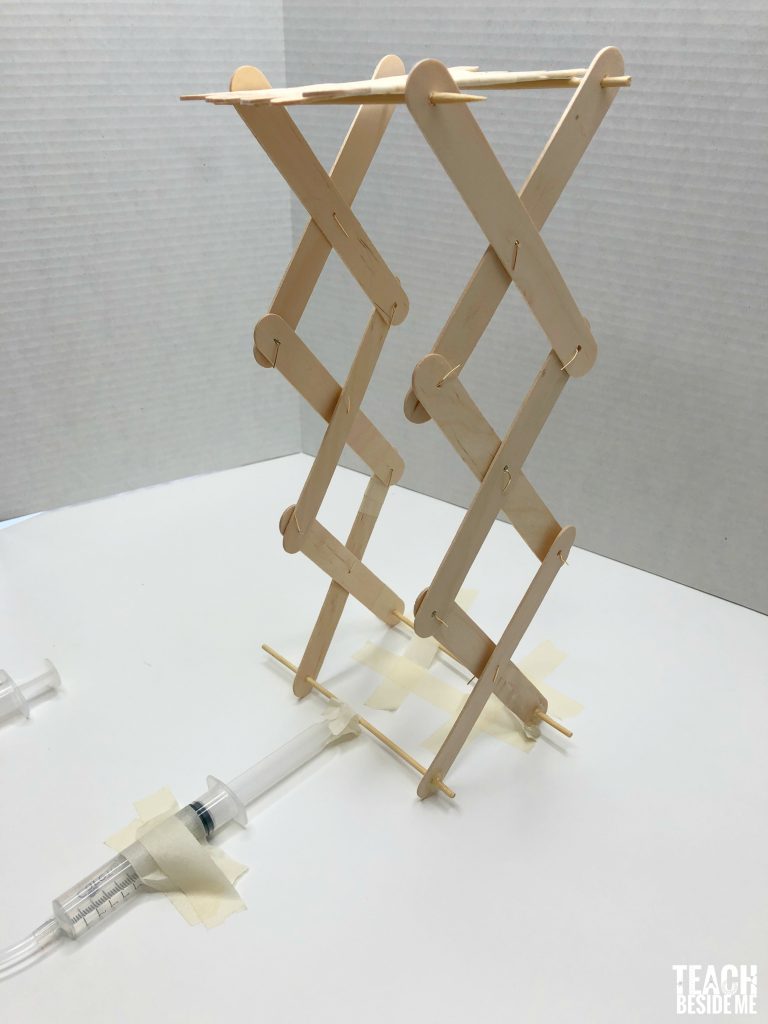
Assemble the elevator arms:
-
Make a second identical set of six sticks.
-
Join the two moving sides together by sliding a wooden skewer through the bottom and top holes.
-
Add a dab of hot glue to secure sticks if needed.
As you can see in the photos, I had a few of my sticks split a bit and I taped them with some masking tape.

Build the platform:
-
Tape five more jumbo sticks together to form a flat surface for the elevator platform.
Attach to the surface:
-
Tape the bottom skewer securely to your table or work surface.
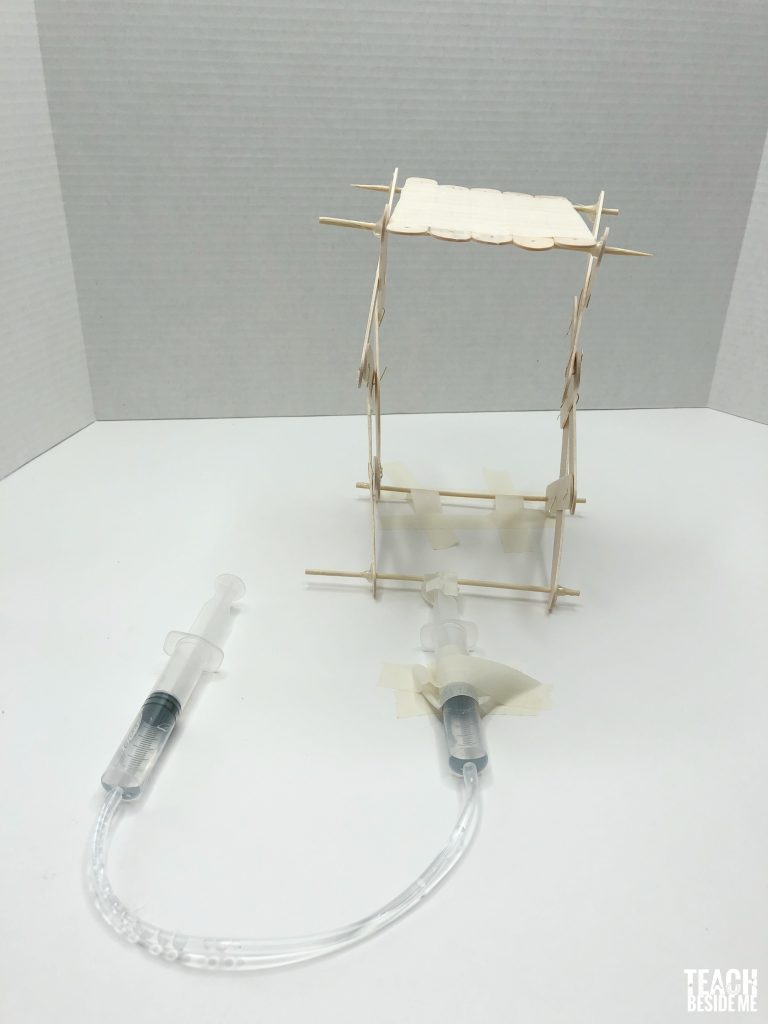
Prepare the hydraulic system:
-
Cut a small piece of tubing and connect it between the two syringes.
-
Fill one syringe with water before attaching the tubing.
-
Tape one syringe body down to the table.
-
Attach the moving plunger end of the other syringe to the front skewer.

Test it out!
-
Push and pull the syringe plunger to lift and lower your hydraulic elevator!
The Science Behind Hydraulic Systems
Hydraulic systems work by using liquids under pressure to transfer force.
When you push on the plunger of one syringe, the water is incompressible, so it immediately pushes on the other plunger — causing the elevator to rise.
This is the same principle used in:
-
Real elevators
-
Car brakes
-
Construction equipment like backhoes and lifts
Key concept: Liquids can’t be compressed easily, so they make great force transmitters!
How to Turn This into a Math Activity
In Elevator Magic, the story counts up and down different floors — practicing addition and subtraction.
You can expand this idea by:
-
Making a poster behind your elevator showing floors 1–10.
-
Using small toys as “passengers” riding the elevator.
-
Practicing math facts by adding and subtracting passengers at each floor.
(Example: 3 riders go up to floor 5, 2 get off — how many are left?)
A simple, playful way to build early math skills while engineering!
Extensions and Variations
Want to take it even further?
-
Double the size: Build a taller elevator by adding more popsicle stick pairs.
-
Measure lift force: Use different amounts of water and compare how much force is needed.
-
Race challenge: Build two elevators and see who can lift a toy to the top fastest!
Check out my Science Art book for more inspiring projects!
![]()

Today I am participating in the Storybook Science series hosted by Inspiration Laboratories. Make sure to stop by and visit to see all of the other fantastic Storybook Science activities!


This is really creative! I will have to save this project so I can try it with my kids on one of our STEM Fridays. Where did you find the syringes and tubing?
I got mine through Amazon- the links are there in the post! 🙂
Hi Karyn,
Could I purchase this item of the HYDRAULIC ELEVATOR from you. My hands are not able to put this together.
Thank you,
Kathy Lincoln
klincoln@sspeterandpaulschool.com
Kathy, I am so sorry, I am not able to do that right now.
I can try?
Very creative Karyn, I’ll try it with my kids today!
Thanks
how do you keep it from leaking? I tried duck tape
I didn’t really have leaking issues. I wonder if your tubing was too big?
Where did you get the tube? And the syringes?
Nice work!!!
Hi, Karyn,
I was wondering if the wire is necessary to connect the popsicle sticks or if it could be substituted? I’m a librarian and sometimes I’m limited in what I can order and use so I’m trying to brainstorm how I could possibly alter this to do with my program kids. Many thanks!
You could maybe try metal brads or twisty ties perhaps?
I used paper clips.
The idea is very good, is there another example for biology. (form Indonesia)
If you had the popsicle sticks pre-drilled, how long do you think it would take you to build on with kids?
Hi, I don’t understand the last step where you attach the syringe to the wooden dowel. How does that raise the elevator?
When you move the dowel in front, it gets closer to the taped down dowel in the back. This is like closing a pair of scissors. The whole tower gets taller and narrower.
Ok, cool! How is this a science fair project though? In ISEF, you need an independent variable, and a dependent variable, this way you can run experiments and test. How do you test this and get data from it?