Fun Food Science Activity for Kids: Bread in a Bag Experiment
This post may contain affiliate links.
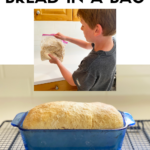
Looking for fun food science activities for kids? This Bread in a Bag experiment is a hands-on way to teach kids about baking, chemistry, and the science of yeast while making a delicious homemade loaf of bread!
This experiment is great for classrooms, homeschool science lessons, or just a fun kitchen activity. Kids will mix, knead, and watch the dough rise—all inside a bag! It’s a simple, mess-free way to explore food science concepts while baking.

I used to use this recipe in my Foods & Nutrition class when I taught high school Home Economics classes over 20 years ago! My students always loved this activity and so do my own kids!

This Bread in a Bag recipe is delicious and simple to make. You needn’t fear baking bread with this one! Bread making is often scary to people, but I promise anyone can do it. Everyone loves homemade bread.

Why Make Bread in a Bag?
Hands-on food science experiment – Kids see chemical reactions in action as yeast ferments and the dough rises.
Sensory learning – Mixing and kneading in a bag makes it a tactile, hands-on experience.
Great for STEM learning – Teaches math (measuring), science (fermentation), and life skills (baking).
Delicious end result – A homemade loaf of bread to enjoy!
This is a fantastic kitchen science experiment that helps kids understand the role of yeast, gluten, and fermentation in baking.
Loaf of Bread in a Bag Recipe

Bread in a Bag Recipe
Ingredients:
4 cups of flour (1 cup whole wheat + 3 cups white flour, or all white flour)
1 tablespoon rapid rise yeast
2 tablespoons sugar
1 teaspoon salt
1 1/2 cups very warm water
2 tablespoons butter or oil
Cooking spray
1 gallon-size Ziploc bag
Loaf pans
Download the Printable Bread in a Bag Recipe Here!
Step-by-Step Instructions
Step 1: Mix the Dry Ingredients
- Add flour, yeast, sugar, and salt to a gallon-sized resealable bag.
- Seal and shake well to mix the dry ingredients.

Step 2: Add the Wet Ingredients
- Pour in the warm water and add butter or oil.
- If using butter, make sure it is soft.
- Seal the bag and press out most of the air.

Step 3: Knead the Dough
- Let kids gently squeeze and knead the bag to mix the ingredients.
- After a few minutes, check the dough’s consistency—if too sticky, add a little more flour; if too dry, add a tiny bit of water.

Step 4: Watch the Dough Rise
- Let the bag sit for 30 minutes. Kids will see bubbles form as the yeast ferments, releasing carbon dioxide!

Step 5: Shape and Bake
- Open the bag and place the dough on a lightly floured or greased surface.

- Shape the dough into a loaf and place it into a greased loaf pan.
- Cover with plastic wrap and let rise for about 1 hour, or until doubled in size.

Step 6: Bake the Bread
- Preheat oven to 350°F (175°C).
- Bake for 25-30 minutes, until the top is golden brown.
- Let cool before slicing. Enjoy!
This dough can also be used for rolls, breadsticks, or even pizza crust!

Preheat the oven to 350 degrees Fahrenheit and bake for 25-30 minutes, until golden brown on top. Cool slightly before slicing.

This dough could also be used as rolls, breadsticks, a loaf, or even as a pizza crust. Use as desired.
The Food Science Behind This Activity
How Does Bread Rise?
Yeast is a single-celled fungus that plays a key role in fermentation:
- Yeast consumes sugar and starch in the dough.
- It produces carbon dioxide (CO₂) gas, which forms bubbles.
- The dough expands as the gas gets trapped in the gluten structure.
- Baking solidifies the structure, creating the fluffy bread texture we love.
This is an example of a chemical reaction—kids can see and feel the science happening in real-time!
Why Use Warm Water?
Yeast is most active between 105-115°F. Too cold? The yeast won’t activate. Too hot? It dies! That’s why warm water is crucial to a good rise.
This Bread in a Bag experiment is one of the best food science activities for kids, combining baking, chemistry, and sensory learning in a way that’s both educational and delicious.
It’s a perfect STEM activity for homeschoolers, teachers, or parents who want to make science exciting in the kitchen!
Have you tried making bread in a bag? Share your experience in the comments below!
Check out my Kitchen Science Experiments post to see another way to show how best work!

See More Food Science Experiments and Activities:
The following simple experiments will allow for exploration and learning in such a fun way!
Kitchen Science: Homemade Hard Candy Lollipops
Kitchen Science: Homemade Butter in a Jar
How to Make Ice Cream in a Bag: Summer Science Experiment
Magic Green Cookies: Color-Changing Food Science Recipe
Kitchen Chemistry: Cake Experiment
Space Food: How to Make Astronaut Ice Cream
How to Make a Lemon Volcano Science Experiment
Self Inflating Balloon: Baking Soda and Vinegar Balloon Experiment
If your kids love cooking activities, Raddish Kids is another fun way to build confidence in the kitchen while learning real cooking skills. Their monthly kits include kid-friendly recipes, cooking tools, and themed culinary activities that make cooking feel creative, educational, and fun for the whole family.