
Glue and Salt Spiderweb Craft: Colorful Salt Painting for Kids
This post may contain affiliate links.
Looking for a colorful spider web craft that combines art, science, and children’s literature? This glue and salt spider web craft is a beautiful way for kids to explore texture, watercolor painting, and the fascinating patterns found in spider webs.
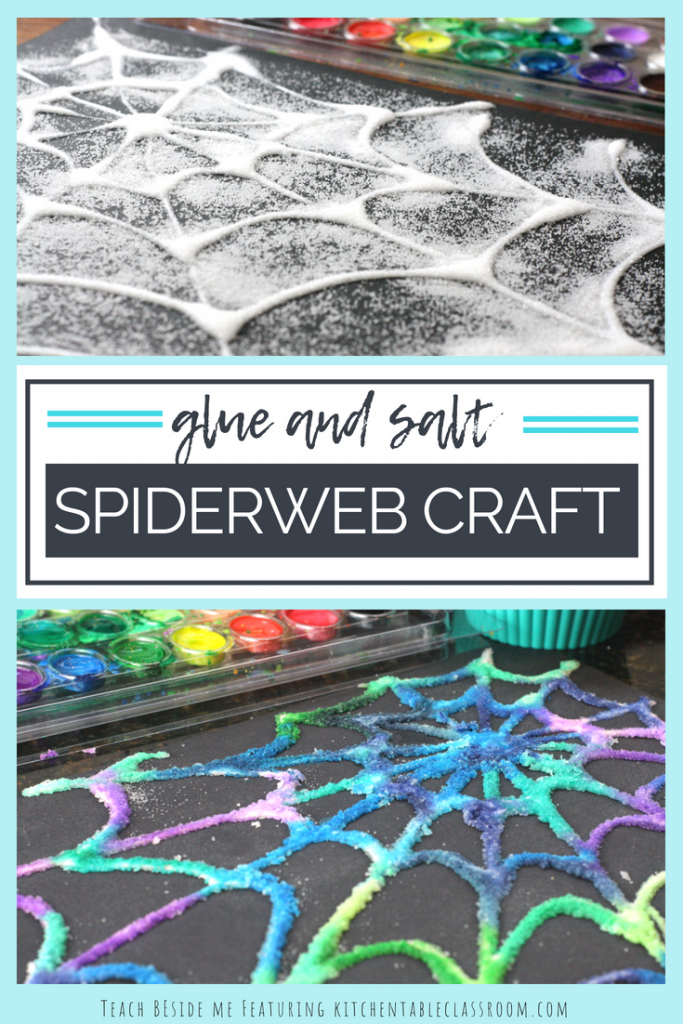
Using just glue, salt, paper, and watercolor paints, children can create raised spider webs that come alive with color. As they touch their paintbrushes to the salt, they can watch the colors travel and blend along the web.
This creative project was originally shared with us by Jodi from The Kitchen Table Classroom, a former art teacher and homeschool mom. She paired the activity with Eric Carle’s classic children’s book The Very Busy Spider, making it a wonderful combination of art and literacy.
It’s a fun fall art project, a Halloween craft, or an addition to a spider science unit!
For more creative spider projects, try our Straw and Pipe Cleaner Spider Web STEM Challenge or Spider Web Snowflakes.
Inspired by The Very Busy Spider by Eric Carle
One of the best ways to introduce an art project is with a good book!
I love beginning art lessons with a story because it gives children time to settle in, listen, observe, and find inspiration for their own creations.
For this spider web painting activity, she chose The Very Busy Spider by Eric Carle.
Eric Carle’s illustrations are known for their vibrant colors, interesting textures, and beautiful collage techniques. His books, including The Very Hungry Caterpillar and Brown Bear, Brown Bear, What Do You See?, are wonderful examples of how artwork can help tell a story.
As you read The Very Busy Spider, encourage children to pay special attention to the illustrations.
Ask questions such as:
- What shapes and lines do you notice in the spider web?
- How does the web change as the story progresses?
- What colors and textures do you see in the pictures?
- How do you think Eric Carle created his illustrations?
- How could we create texture in our own spider web artwork?
Taking a few extra minutes to observe and discuss the illustrations turns storytime into an active art-learning experience.
After reading, children can create their own textured spider webs using glue, salt, and watercolors.

Supplies for Glue and Salt Spider Web Painting
You’ll need just a few simple art supplies:
- Black construction paper or sturdy tagboard
- Pencil
- White school glue, such as Elmer’s
- Regular table salt
- Watercolor paints
- Soft paintbrush
- Water
- Small bowl or ramekin for salt
- Optional: Ruler
I used black paper for this project because the colorful salt lines really stand out against the dark background.
However, you can use other colors of construction paper or even white paper if that’s what you have available.
Tip: Sturdier paper works best because the glue and watercolors can cause thinner paper to curl or wrinkle.

How to Make a Glue and Salt Spider Web Craft
This spider web art project has two main stages: creating the raised glue-and-salt web and painting it with watercolors.
Plan to let the glue dry completely before adding paint. Jodi recommends allowing the project to dry overnight.
Step 1: Draw Your Spider Web
Begin by marking a small dot near the center of your paper. Using a pencil, draw several straight lines extending outward from the center point toward the edges of the paper.
These lines will form the main framework of the spider web. You can draw them freehand or use a ruler.
I recommend starting with fewer lines rather than too many. Remember that tracing the pencil lines with glue will make them thicker.
Next, connect the straight lines with curved lines to create the familiar spider web pattern.
Leave enough space between the curved lines so the glue won’t run together.
Math connection: Point out the lines radiating from the center and the repeating shapes between them. Children can explore angles, patterns, and the approximate symmetry of their spider web designs.

Step 2: Trace the Spider Web with Glue
Carefully trace the pencil lines with white school glue. Start with the long lines extending from the center, then add the curved connecting lines.
For smoother glue lines, I suggest holding the glue bottle slightly above the paper instead of dragging the tip directly against it.
You may want to let younger children practice squeezing glue onto a scrap piece of paper first. Encourage them to use steady pressure and move slowly. The glue doesn’t have to be perfect! Slightly uneven lines can add interesting texture to the finished spider web.
Step 3: Sprinkle Salt Over the Glue
While the glue is still wet, it’s time to add the salt. Give each child a small bowl of regular table salt. Using their fingers, have them sprinkle salt generously over all the glue lines.
Make sure the glue is completely covered. Then gently tilt the paper to remove the excess salt. It’s helpful to do this over a tray or another sheet of paper to catch the extra salt.
The salt will stick to the wet glue, creating raised, textured spider web lines.
Step 4: Let the Spider Web Dry
Set the artwork aside until the glue is completely dry.
Jodi recommends leaving the spider webs overnight, although drying time will vary depending on how much glue was used and the humidity in your home. Try not to move or handle the web too much while it’s drying.
Once dry, the salt-covered glue lines will be ready for painting.

Step 5: Paint the Salt Spider Web with Watercolors
Now comes the really exciting part! Prepare your watercolor paints with plenty of water. Using a soft paintbrush, gently touch a small amount of watercolor paint to one of the salt-covered lines. Watch what happens!
The color will begin to spread through the salt, creating beautiful streaks and blends along the web. Encourage children to experiment with different colors, placing them near one another and watching how they interact.
Use a very gentle touch. Rather than brushing back and forth, dab or drop the watercolor onto the salt. Scrubbing can disturb the salt and soften the glue beneath it, damaging the raised web.
Let children explore how the colors move and blend. The finished spider webs look especially beautiful against black paper!
Why Does Watercolor Spread Through Salt?
This activity isn’t just an art project. It’s also a fun opportunity to explore a little science! When watercolor paint touches the salt, the colored water can move through the tiny spaces between the salt crystals.
This movement is related to capillary action, the same general process that helps water travel through narrow spaces in materials such as paper towels.
Salt also dissolves in water, which can change the texture of the painted lines as children add more liquid.
The combination of water movement, dissolving salt, and watercolor pigment creates the beautiful spreading effect.
Try asking children:
- What happens when you touch the paintbrush to the salt?
- Does the color move farther when you add more water?
- What happens when two colors meet?
- Do all the colors spread in the same way?
- What happens if you add too much water?
These simple observations encourage children to think like scientists while creating art.
Spider Web Science: Why Do Spiders Build Webs?
This craft is also a great opportunity to learn about real spiders!
Many spiders create webs using silk produced by specialized organs called spinnerets. Spider silk is remarkably strong for its weight and can be flexible, stretchy, or sticky depending on its purpose. Spiders use silk for many different things, including catching prey, protecting eggs, making shelters, and traveling.
One familiar type of web is the orb web, which has a series of lines radiating from the center connected by spiral threads. That’s the type of web that inspires this craft.
But not all spiders make circular webs! Some build sheet webs, funnel webs, or tangled webs, while others hunt without using a prey-catching web at all. You can use this project to introduce children to the amazing variety of spiders and their webs.
For a deeper look at these fascinating creatures, explore our Spider Life Cycle for Kids with Free Printable Worksheets.
Tips for Successful Salt Painting
A few simple adjustments can make this project much easier, especially when working with younger children.
- Use sturdy paper. Construction paper or tagboard helps support the glue and salt.
- Leave space between the web lines. Thick glue lines can spread and merge if they’re too close together.
- Use regular table salt. Its small crystals work well for creating detailed raised lines.
- Cover the glue while it’s wet. The salt needs wet glue to stick properly.
- Let the web dry completely. Rushing this step can make the painting stage messy.
- Use a soft brush and gentle dabbing motions. Avoid scrubbing the salt lines.
- Experiment with the amount of water. Watercolor needs moisture to spread, but too much can wash away the details.
You can also place a tray underneath the artwork to catch stray salt and watercolor drips.
More Learning Ideas with Spider Web Salt Painting
Want to extend the project beyond the original art lesson? Here are a few simple ideas.
Explore Spider Web Geometry
Look closely at the lines and shapes in your spider web. Count the lines extending from the center and identify the shapes formed between them. Compare your artwork with photographs of real orb webs.
Are all the spaces the same size? Are real spider webs perfectly symmetrical?
Experiment with Color Mixing
Choose two watercolor colors and apply them to opposite ends of a salt line. Observe what happens when the colors travel toward each other. Try different combinations to see which new colors appear.
Make a Spider Web Art Gallery
Have each child create a different spider web design. Display the finished artwork together and compare the colors, patterns, and shapes. This makes a beautiful seasonal art display for a classroom or homeschool space.
More Spider Crafts and Activities for Kids
If your kids enjoyed making these colorful salt-painted spider webs, try some of our other spider-themed learning activities:
- Spider Life Cycle for Kids + Free Printable Worksheets — Explore how spiders grow and develop.
- Spider Web Snowflakes: Halloween Craft + Math — Combine spider web patterns with geometry and paper crafting.
- Spider Web STEM Challenge: Straw and Pipe Cleaner Craft — Build a three-dimensional spider web while exploring engineering and design.
You can also try our Watercolor and Salt Snowflake Craft for another beautiful salt painting project.
A Beautiful Combination of Art, Literature, and Science
I love how this project brings together so many different kinds of learning.
Children can enjoy a wonderful picture book, observe the illustrations, experiment with an interesting painting technique, and learn about the patterns found in real spider webs. And the finished artwork is colorful enough to display all season!
A special thank-you to Jodi for sharing this creative spider web art lesson with Teach Beside Me.
Have you tried glue and salt painting with your kids? I’d love to hear how your spider webs turned out!

Hi, I’m Jodi! I’m a former public school art teacher turned home school mama to my four kids. I blog at the Kitchen Table Classroom as a way to fulfill my own creative passion and help other moms bring a little artistic fun into their own home! Art should be the best part of your home school day and I’m here to help that happen!
Come visit me at the Kitchen Table Classroom for over a hundred free art lessons and a Resource Library full of free printable resources!






Greetings! I am a STEM teacher this year and I have already found some lesson plans which focus on different careers with a fall theme. For example, we are going to dabble in forensic scientist and do an experiment on blood splatter, orthopedists and study human bones, and arachnologists involving discovering a new type of spider! This spider web project caught my eye. It is simple and amazing! I think it will enhance my lesson and I know my students will love it! Thanks for sharing!
Wonderful! I am so glad you came by, and glad you enjoy this project. It’s definitely a fun one.
I’ve just started my home school journey I am so glad I found you. Thank you for the inspiration
Do these hold up well to save. Or will the salt crumble off the paper? I teach a homeschool art class and would want these to be able to hold up for an end of the year art show if possible.
Are you talking about the pallet of water colors that come in a long tin? How do you dispense the colors? Could you show a picture or explain further? Thank you!
Hi There! This project is adorable but for some reason our paint did not spread. We used elmers glue, Morton iodized salt, and crayola watercolor paints. Any suggestions on what we should try differently next time?
Being a teacher with a Bachelor of Fine Arts degree, I’ve used food coloring with iodized salt, and my snowflakes turned out very well. Most possibly your watercolor paints…were used with no run crayola glue… maybe that was the difficulty? crayola.com has a watercolor salt painting site… try trouble shooting the problem with them? Watercolor paints usually work well with the glue/salt 🙂