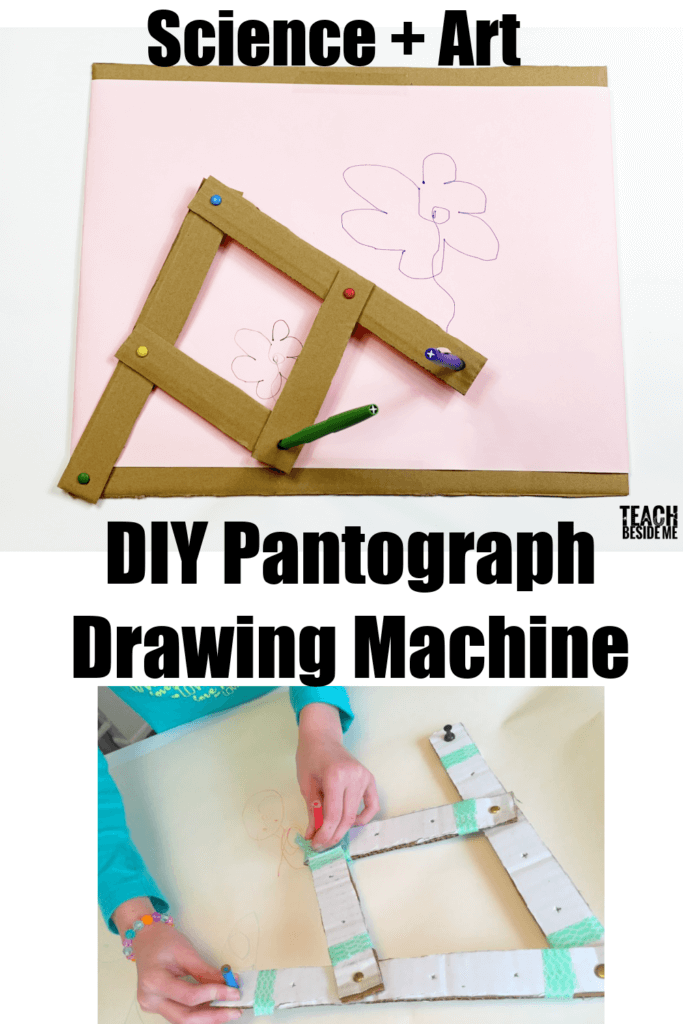
How to make a Pantograph Drawing Machine
This post may contain affiliate links.

Combine science, art, engineering, and math in this awesome homemade pantograph drawing machine project for kids!
This hands-on STEM activity lets kids build a simple machine that can copy and enlarge drawings using geometry and mechanical motion. It is one of those projects that feels almost magical the first time you try it.
This pantograph project is featured in my book Science Art and Drawing Games for Kids, and it has always been one of our favorite STEM art activities to build together.
What Is a Pantograph?
A pantograph is a mechanical drawing tool used to copy, enlarge, or reduce images. It works using a system of connected levers and linked arms that move together in proportional motion.
Pantographs have been used throughout history by:
- artists
- engineers
- architects
- inventors
- engravers
- draftsmen
Before modern printers and computers, pantographs were an important way to duplicate and scale drawings accurately.
Modern pantographs are also sometimes used in engraving machines, woodworking tools, and quilting machines to create repeated or enlarged patterns.

How Does a Pantograph Work?
A pantograph works by transferring movement through a system of connected arms. As one pencil moves along an original drawing, another pencil copies the movement at a different scale.
Because the arms are connected proportionally, the second drawing can become:
- larger
- smaller
- or the same size
This simple machine demonstrates several important STEM and math concepts including:
- geometry
- ratios
- scaling
- proportional relationships
- levers
- mechanical motion
- engineering design
Kids are often fascinated watching the second drawing appear automatically as they move the first pencil!
The Science & Math Behind a Pantograph
The pantograph uses linked arms and proportional distances to create scaled drawings. The size of the copied image depends on the placement and lengths of the cardboard arms.
This project is a fantastic hands-on way to explore:
- ratios in math
- scale drawings
- engineering principles
- spatial reasoning
- mechanical linkages
- geometric relationships
The movement of the pantograph also demonstrates how levers transfer motion from one point to another.
Supplies You Will Need
- Corrugated cardboard
- Large drawing paper
- Metal brads
- 1 thumbtack
- Ruler
- Pencils or markers
- Scissors or utility knife
- Tape

How to Make the Pantograph Drawing Machine
Step 1: Cut the Cardboard Strips
Cut four strips of cardboard about one inch wide.
- Cut two strips 10 inches long
- Cut two strips 6 inches long
You will also need a larger square piece of cardboard for the base.
Corrugated cardboard works best because it is sturdy while still being lightweight enough to move easily.
Step 2: Connect the Long Pieces
Connect the two long cardboard strips together at the top using a metal brad.
Use scissors or a utility knife to carefully poke holes for the brads.
These connected pieces will become the main moving arms of the pantograph.
Step 3: Add the Short Pieces
Attach the smaller strips to the center of each long strip using metal brads.
Overlap the free ends of the short strips and create a hole large enough for a pencil or marker to slide through.
This center pencil will become the drawing point.

Step 4: Create the Bottom Connections
Poke holes at the bottom of each long strip.
- The left side will connect to the cardboard base with a brad.
- The right side will hold another pencil or marker.
These connection points allow the pantograph machine to pivot and move smoothly.
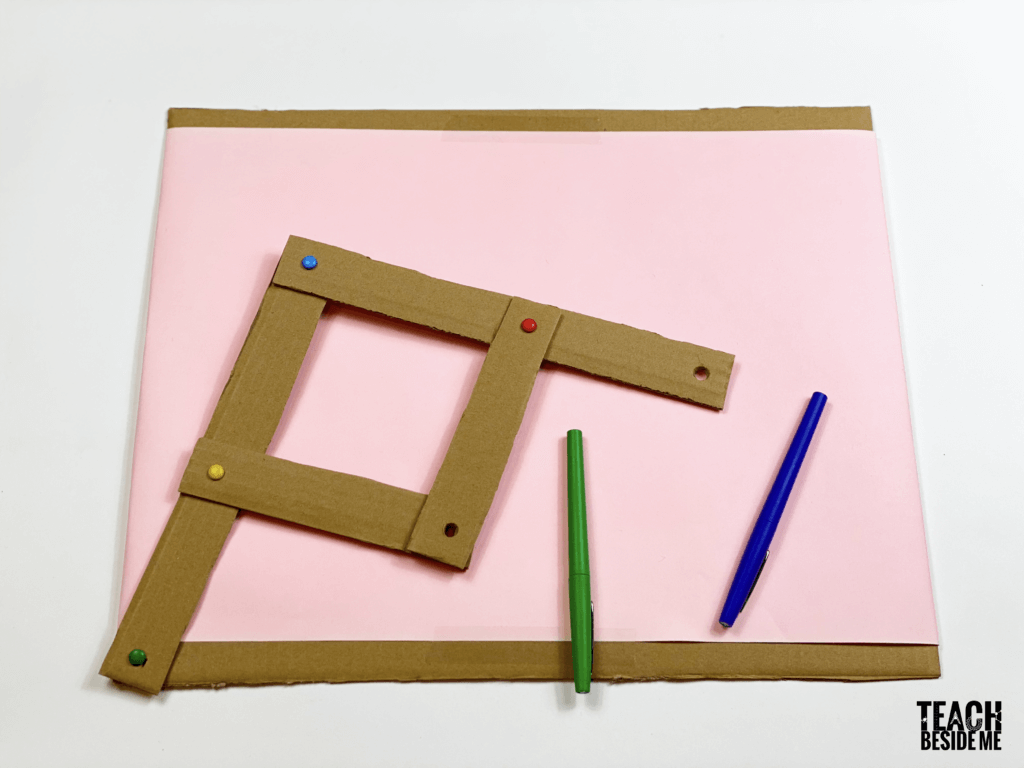
Step 5: Attach the Pantograph to the Base
Tape a large piece of drawing paper onto a larger piece of cardboard.
Attach the left side of the pantograph to the lower left corner of the cardboard using a metal brad.
The pantograph should now move freely back and forth.

Pantograph Drawing Ideas for Kids
Need inspiration? Try using your pantograph drawing machine to:
- enlarge tiny sketches
- create giant chalk art outside
- duplicate leaf shapes
- make geometric art
- copy favorite cartoons
- create symmetrical designs
- experiment with abstract art
- design inventions or blueprints
This project works beautifully for:
- STEM classes
- homeschool science
- makerspaces
- engineering units
- art projects
- summer camps
- science clubs

What Is the Golden Ratio?
Pantographs relate closely to mathematical scaling and proportional relationships. Some pantograph systems can even demonstrate concepts connected to the golden ratio, a mathematical ratio found frequently in:
- art
- architecture
- design
- nature
The golden ratio appears in things like:
- flower petals
- shells
- spiral patterns
- famous artwork
- building designs
Exploring proportional drawing tools like a pantograph is a fun way to introduce these bigger math ideas visually and hands-on.

Real-World Uses for Pantographs
Pantographs have been used in many different fields throughout history.
Some real-world uses include:
- engineering blueprints
- drafting tables
- engraving tools
- woodworking machines
- railroad pantographs
- scaling maps and drawings
- enlarging artwork
- quilting machine designs
My grandfather used drafting machines while sketching inventions and blueprints, and I always loved watching the moving arms and mechanical drawing tools on his drafting table.
Easy Variations to Try
Want to experiment further? Try:
- making a giant outdoor chalk pantograph
- building one from wood instead of cardboard
- changing the arm lengths
- testing different scaling ratios
- using markers instead of pencils
- creating a reducing pantograph instead of enlarging
- decorating the cardboard arms with paint or designs
Older kids may even enjoy designing their own modified versions.
This homemade pantograph drawing machine is such a fun way to combine creativity with engineering and math. Kids love seeing how simple mechanical motion can enlarge drawings and create scaled copies automatically.
It is hands-on, educational, artistic, and surprisingly mesmerizing to use.
Whether you are teaching STEM, engineering, geometry, drafting, or simply looking for a creative science activity, this pantograph project is a fantastic way to help kids explore how art and math work together.
More STEM Art Projects Kids Will Love
If your kids enjoyed this pantograph drawing machine, they may also enjoy:
- Math Art: Spirolaterals
- How to Make a Bristle Bot: A Simple STEM Robot for Kids
- DIY String Spinner Toy (Button Spinner): Classic STEM Craft
- Math Art: Symmetrical Pattern Coloring Cards
You can also find this project in my book Science Art and Drawing Games for Kids along with many more creative STEM activities that combine science and art together.
![]()


That looks so neat! I pinned it to ask my boys if they’d like to try taking on the challenge.
Awesome idea. The contest sounds like an awesome opportunity!
Thank You Ever So Much !! 😀 I was so looking for a simple pattern for one of these This is an awesome find on the world wide web Thank you again Oh by the way Nice Web Page !