Leonardo da Vinci Experiment for Kids: Build a Bridge!
This post may contain affiliate links.
Leonardo da Vinci was one of the greatest minds in history—an artist, scientist, engineer, and inventor whose ideas still inspire us today. His notebooks were filled with sketches of inventions, machines, and engineering marvels far ahead of his time.
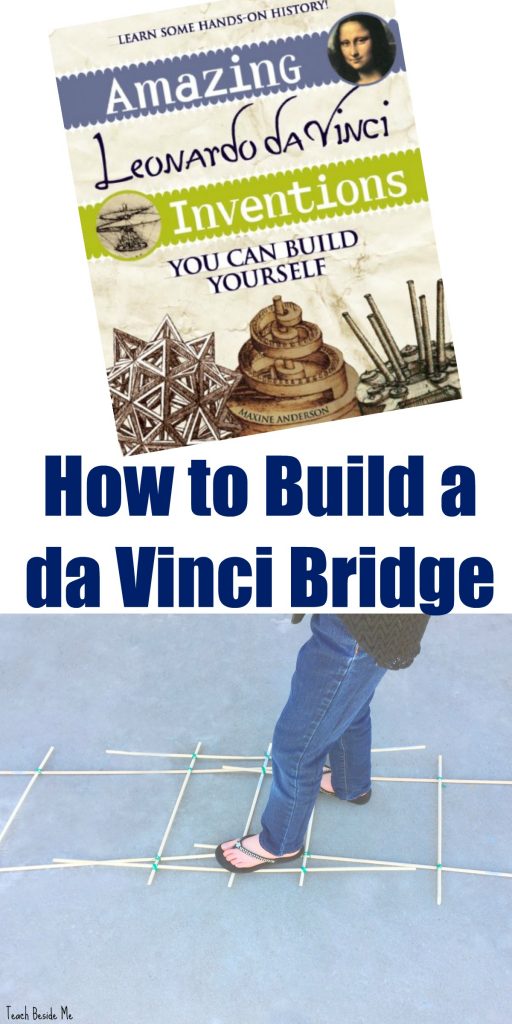
One fun way to explore Leonardo’s genius is through hands-on STEM projects. A great resource is Amazing Leonardo da Vinci Inventions You Can Build Yourself by Maxine Anderson, which features kid-friendly experiments inspired by his designs. One of the most exciting projects you can try at home or in the classroom is da Vinci’s self-supporting bridge!
The Story the Behind Leonardo Da Vinci Bridge
In 1499, after the French invaded Italy, Leonardo da Vinci began working for several powerful leaders, many of whom were involved in military campaigns. During this period, he sketched a design for a transportable bridge, sometimes called the Bridge of the Golden Horn.
This bridge was intended to span great distances—up to 700 feet—to cross harbors and rivers quickly. Because it was designed for the military, it needed to be collapsible, easy to assemble, and made from materials found nearby, like branches, logs, and rope.
The brilliant part of da Vinci’s design is that it is self-supporting—the structure holds together without nails, glue, or fasteners. The overlapping pieces lock into place using only gravity and tension.
Leonardo da Vinci Experiment: How to Engineer a Bridge
You can recreate this engineering marvel with simple supplies! Kids will love building, testing, and experimenting with da Vinci’s bridge.
Supplies Needed
-
11 sticks (popsicle sticks, wooden dowels, or even branches)
-
6 long sticks
-
5 shorter sticks (cut longer ones in half or thirds if needed)
-
-
Twine, rope, or twist ties
(Tip: Popsicle sticks are great for small versions. Use broom handles, pool noodles, or larger branches if you want to scale it up for outdoor play!)

Instructions to Build the Leonardo Da Vinci Bridge
-
Make the first ladder: Use 2 long sticks and 2 short sticks. Lay the long sticks parallel and tie a short stick at each end to form a ladder shape.

-
Make a second ladder: Repeat step one to create a second identical ladder.

-
Overlap the ladders: Place the two ladder pieces end to end, overlapping slightly.

-
Add a support underneath: Slide one short stick underneath the overlapping ends.

-
Add a long support on top: Place one long stick over the ends and weave it under the short support stick. This creates tension that locks the pieces together.
-
Form the arch: Adjust the placement until the bridge forms an arched shape. Tie or twist as needed to stabilize.

Testing and Experimenting
Now comes the fun part—testing da Vinci’s bridge!
-
Challenge kids to see how much weight it can hold. Start with toy cars or books.
-
Try reinforcing it with extra sticks, branches, or even LEGO bricks.
-
Build a smaller version with popsicle sticks, then a larger version outdoors.
-
Compare which materials make the bridge strongest.
Important note: If kids try standing on it, keep it low to the ground for safety!
Teaching Connections
This activity is a perfect way to blend history, engineering, and STEM learning:
-
History: Connect it to the Renaissance and da Vinci’s many inventions.
-
Engineering: Discuss why self-supporting structures are useful.
-
STEM Skills: Encourage kids to design their own bridge variations, test materials, and record results.
You can also tie it into lessons on:
-
Simple machines
-
Forces (tension, compression, gravity)
-
Real-world bridges and architecture
Building Leonardo da Vinci’s bridge is a hands-on way for kids to step into the shoes of one of history’s greatest inventors. With just a few sticks and string, you can recreate an invention from over 500 years ago—and spark curiosity about history, engineering, and problem-solving!
See More STEM Projects for Kids!
Three Little Pigs STEM Project for Kids
STEM Project- Build a Hydraulic Elevator