Mondrian Style Fibonacci Art: Hands on Science Art for Kids
This post may contain affiliate links.
I’ve always been fascinated by the golden rectangle and the Fibonacci sequence—patterns that show up in flowers, shells, storms, and art. I didn’t appreciate any of this as a kid, but now I love helping my own kids see the beauty in math through hands-on, creative projects. This Mondrian-style Fibonacci art activity has become one of our favorites because it blends math, art history, and simple design in a way kids instantly understand.
Teaching math creatively helps kids engage with it differently. Instead of feeling intimidated or bored, they get to experience the pattern for themselves. And when you combine math with a famous artist like Mondrian, it becomes even more meaningful and memorable.

What Is the Fibonacci Sequence?
The Fibonacci sequence is a pattern where each number is the sum of the two before it:
1, 1, 2, 3, 5, 8, 13…
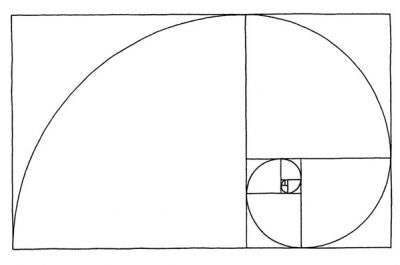
When these numbers are used as square dimensions and placed together, they create the golden rectangle, one of the most recognizable patterns in nature. You can find this spiral in pinecones, hurricanes, sunflowers, nautilus shells, galaxies, and even the proportions of famous architecture.
It’s one of the simplest ways to show kids how math connects to the world around them.

Who Was Mondrian?
Piet Mondrian was a Dutch artist known for bold black lines, geometric divisions, and blocks of primary colors—red, yellow, and blue. His abstract style makes an excellent starting point for exploring math concepts like symmetry, balance, and proportion.
Pairing Mondrian with Fibonacci turns a math lesson into an engaging STEAM experience.
How to Make Mondrian-Style Fibonacci Art
Supplies
-
Graph paper or a roll of grid paper
-
Pencil + ruler
-
Black marker or black paint
-
Red, yellow, and blue paint
-
Optional: compass if you want to draw the spiral

Step-by-Step Instructions
1. Start With Fibonacci Squares
Have kids draw each square according to the Fibonacci sequence:
-
1×1
-
1×1
-
2×2
-
3×3
-
5×5
-
8×8
-
13×13
Each new square is created by adding the side lengths of the two smaller ones—an easy way to “see” Fibonacci grow.

2. Outline the Golden Rectangle
Use a ruler and marker or black paint to outline the full rectangle formed by the squares. This creates the clean, geometric base that mirrors Mondrian’s style.
3. Add Mondrian-Inspired Lines
Let kids draw a few additional straight lines inside the rectangle to break up the space. Encourage them to:
-
use strong vertical and horizontal lines
-
keep shapes rectangular
-
aim for balance and simplicity
This part gives them ownership and creativity.

4. Paint With Primary Colors
Mondrian used:
-
red
-
yellow
-
blue
-
black lines
-
white background space
Kids can choose which sections to fill with color while keeping the overall look bold and clean.
5. (Optional) Add the Spiral
Older kids may enjoy drawing the classic Fibonacci spiral using a compass.
It’s a great visual for showing how all the squares fit together.
What Kids Learn From This Project
Math Skills
-
number patterns
-
geometric relationships
-
proportional thinking
Art Skills
-
color blocking
-
abstract composition
-
learning about Mondrian
STEAM Connections
-
math becomes visual
-
art reinforces understanding
-
creativity helps solidify concepts
This is the kind of project that sticks with kids because they get to build something beautiful and mathematical.
Extensions to Try
-
Create a second version using only warm or cool colors.
-
Go on a nature walk to find Fibonacci spirals.
-
Try the project with colored paper instead of paint.
-
Use LEGO bricks to recreate Fibonacci rectangles in 3D.
My kids were so proud of how their Mondrian-style Fibonacci art turned out—and I loved watching math “click” in a way that felt fun and accessible. Math becomes far more meaningful when kids can build it, paint it, and explore it through hands-on discovery.
See More Science Art activities: The COOLEST Science Art Projects for Kids: Hands-On Activities that Mix Creativity and STEM