Spider Web STEM Challenge: Straw and Pipe Cleaner Craft
This post may contain affiliate links.
Looking for a fun Halloween STEM challenge that combines creativity, engineering, and a little spooky decorating? Try building a spider web from straws and pipe cleaners!
This simple spider web craft uses just two basic supplies, but it gives kids an opportunity to experiment with shapes, measurements, structural design, and problem-solving.
My daughter and I came up with this idea together after I spotted some cute Halloween paper straws in the store. I thought they would make a fun spider web decoration, but figuring out how to actually build one turned into a wonderful little engineering challenge!
We had to experiment with the lengths of the straws, how to connect them, and how to make the web hold its shape.
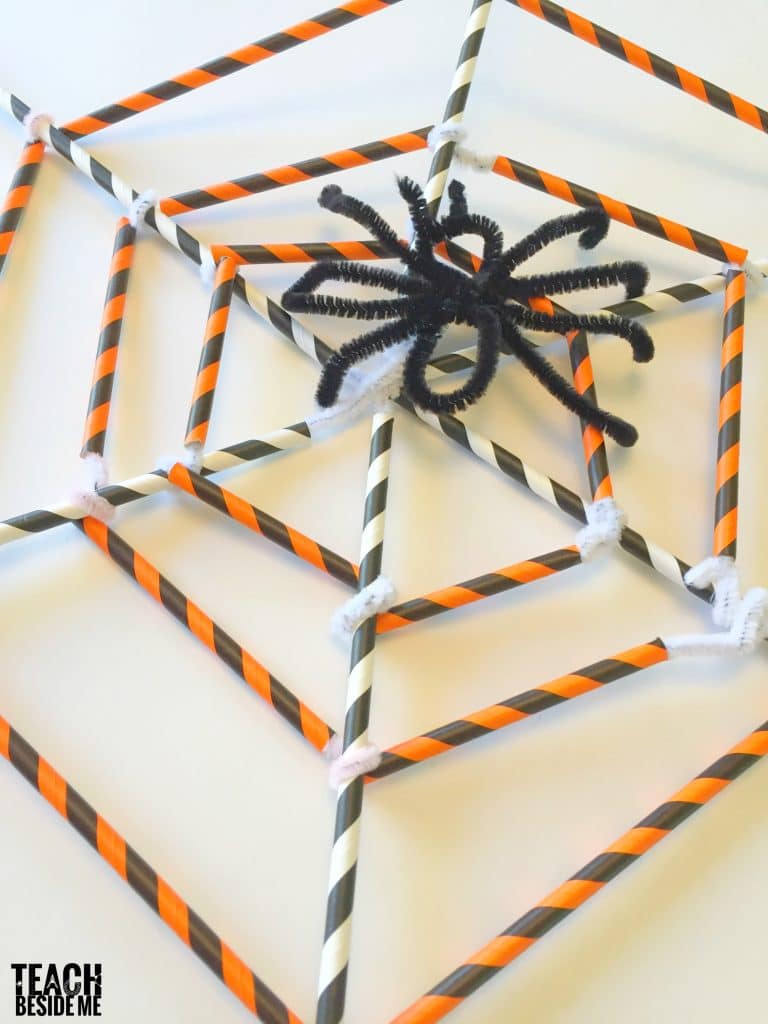
The finished spider web turned out so cute that we hung it on our front door!
Supplies for the Straw and Pipe Cleaner Spider Web
You only need a few simple supplies to make this Halloween spider web craft.
- Approximately 22 paper straws
- Approximately 22 pipe cleaners
- Scissors
- Optional: Additional black pipe cleaners to make a spider
We used Halloween-colored paper straws in contrasting colors to make the different sections of the web stand out.
You can use any colors you like!
Tip: Paper straws work well for this project because they’re lightweight and easy to cut. The pipe cleaners act as flexible connectors that hold the structure together.
How to Make a Spider Web with Straws and Pipe Cleaners
This project can be completed as a guided craft, but I think it’s even more fun when you turn it into a STEM challenge!
Instead of giving children all the instructions immediately, try setting out the supplies and asking them to figure out how to build a spider web on their own.
That’s what my daughter and I did, and we had so much fun experimenting together.
Here is how we made ours.
Step 1: Build the Center of the Spider Web
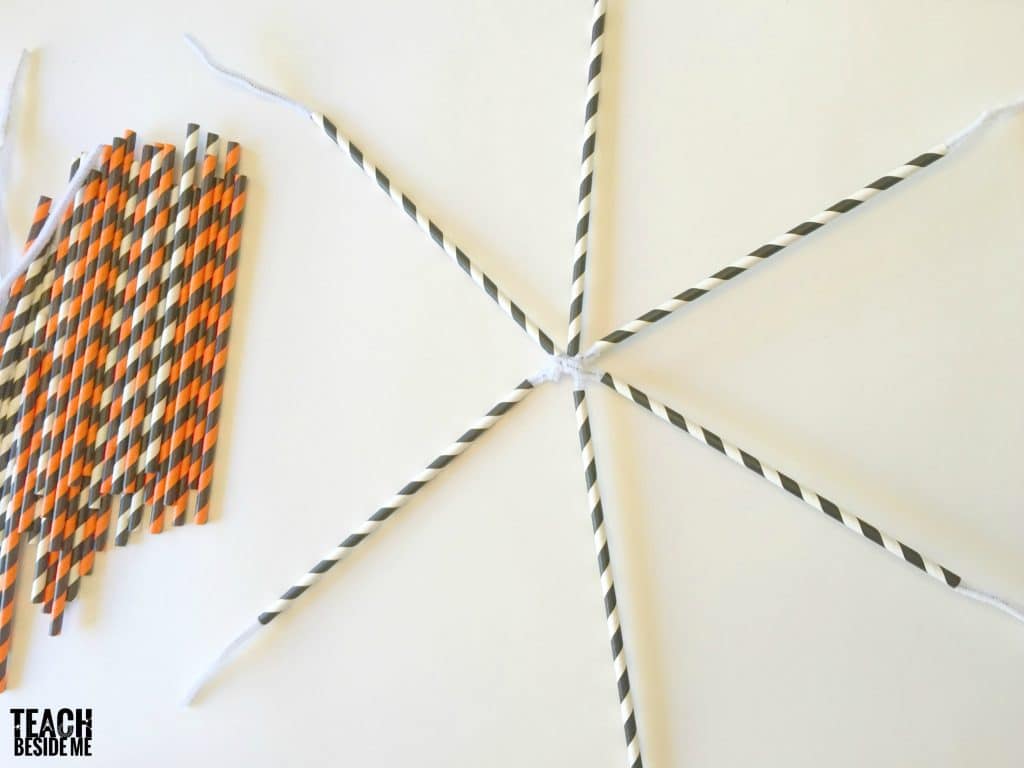
Start by arranging six full-length straws into a star shape, with the straws extending outward from the center.
These will form the main supports, or spokes, of the spider web.
Connect two pipe cleaners by twisting their ends together, then thread them through two straws at a time.
Twist the pipe cleaners together at the center to secure the straws and create the basic star-shaped framework.
Adjust the straws until they are spaced as evenly as possible around the center.
This framework will support the rest of the spider web.

Step 2: Add the Inner Ring
Next, create the first ring of the spider web using shorter pieces of straw.
We found that cutting the straws into thirds worked well for this inner section.
Cut pipe cleaners into shorter lengths as needed, and connect them by twisting their ends together.
Thread the pipe cleaners through the small straw sections, wrapping or twisting the pipe cleaners around the main spokes to attach each piece.
Continue working around the center until you’ve created the first ring of the web.
If a pipe cleaner becomes too short, simply twist another piece onto the end and keep going.
We used a contrasting straw color for these connecting sections, which made the pattern easier to see.
Step 3: Build the Middle Ring
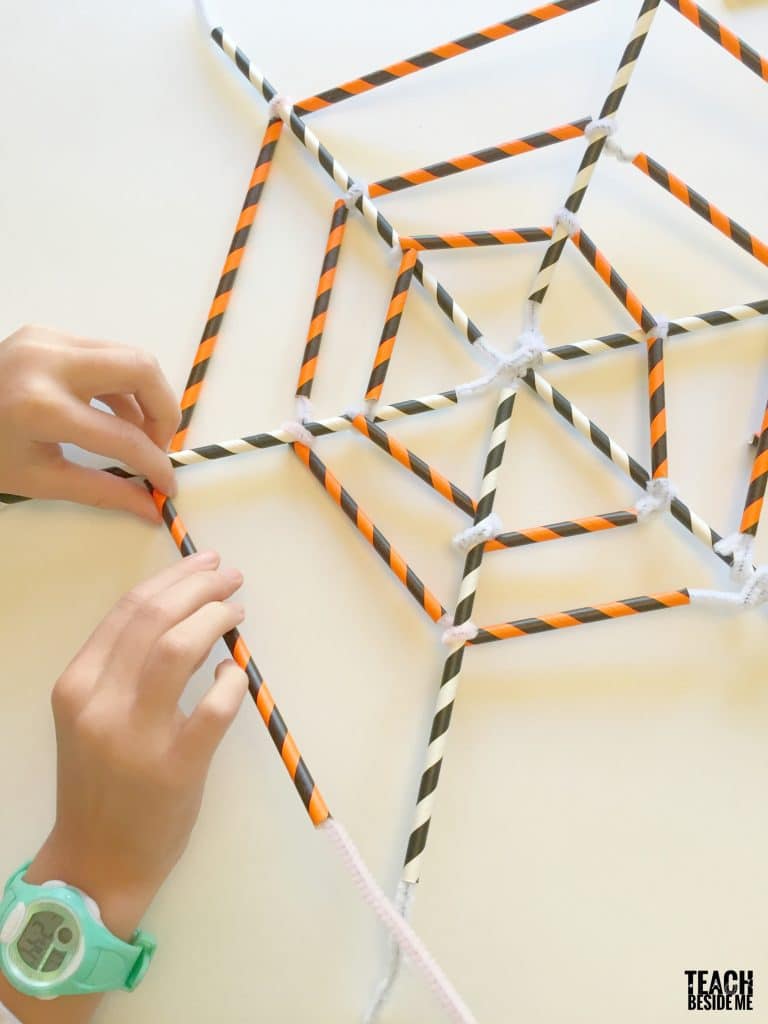
For the next row, we needed longer pieces of straw.
This time, we cut the straws in half.
Repeat the same process, threading pipe cleaners through the straw pieces and attaching them to the main supports.
As you work outward, you’ll notice that the spaces between the spokes become larger.
This is a great opportunity to ask children why the straw pieces need to get longer as the web grows!
Step 4: Complete the Outer Ring
For the outer row of the spider web, we needed even longer pieces.
A full straw was just a little too long for our design, so I cut approximately one inch off the end of each one.
Attach the final straw sections around the outside of the web, connecting them to the main spokes with pipe cleaners.
Adjust the connections as needed to keep the shape balanced.
Your finished web should have six main spokes with three rings of connecting straw pieces.
Don’t worry if your spider web isn’t perfectly symmetrical. Experimenting and making adjustments are part of the engineering process!

Step 5: Make a Pipe Cleaner Spider
Of course, we couldn’t finish our spider web without adding a little spider!
We used three black pipe cleaners cut in half to make ours.
Take four of the cut pieces and twist them together at the center to create eight legs.
Use the remaining two pieces to shape the spider’s head and body, twisting them around the center to hold everything together.
Bend the legs into shape and attach your spider to the web.
Now your Halloween spider web craft is complete!
My daughter was so proud of the one she made. We hung it on our front door, and the kids loved seeing their creation displayed!

Turn This Spider Web Craft into a STEM Challenge
The best part of this activity is that children don’t have to follow the exact same design we used.
You can turn it into an open-ended engineering challenge by giving them the supplies and a simple goal:
Can you build a spider web using only straws and pipe cleaners?
Let children plan, experiment, and revise their designs.
You can guide their thinking with questions such as:
- How will you connect the straws together?
- What shape should you use for the center of your web?
- How can you make the web larger without losing its shape?
- Why do the connecting straw pieces need to change length?
- How can you make the structure stronger?
- What happens if you use more or fewer spokes?
Encourage children to test different designs rather than trying to get everything right the first time.
Add an Engineering Design Challenge
For older children, introduce a few additional constraints.
Try challenging them to:
- Build a web with at least three connecting rings.
- Use a limited number of straws and pipe cleaners.
- Create a web that can hang vertically without collapsing.
- Make a symmetrical design.
- Build the largest possible web using a fixed amount of material.
Have students sketch their plans before building, then compare their finished structures to their original designs.
What worked? What didn’t? What would they change if they built another web?
This process of planning, building, testing, and improving is an important part of engineering.
The Math and Science Behind Spider Webs
There is quite a bit of learning happening in this simple craft!
Geometry and Symmetry
Our straw spider web has six main spokes extending from the center, creating a design with radial symmetry when the spokes and connecting rings are evenly spaced.
Children can explore angles, circles, line segments, and symmetry as they build.
For an extra math challenge, ask older students to calculate the angle between evenly spaced spokes.
With six spokes arranged around a complete circle:
360° ÷ 6 = 60°
Each pair of neighboring spokes would be separated by approximately 60 degrees.
Measurement and Proportions
As the web grows outward, the distance between neighboring spokes increases.
That’s why we used shorter straw pieces near the center and longer pieces toward the outside.
Children can measure their straw sections and compare the lengths of the inner, middle, and outer rings.
You can also challenge them to predict how long each section should be before cutting it.
Structural Engineering
The long straws act as supports, while the pipe cleaners connect the different parts of the structure.
As children assemble their webs, they can observe how the connections affect the stability of the finished design.
Try gently lifting the web by different points and observing what happens.
Does it bend? Twist? Hold its shape?
What changes could make the structure stronger?
How Real Spiders Build Webs
This project is also a fun introduction to the science of spider webs!
Many orb-weaving spiders create webs with radial threads extending outward from the center and spiral threads connecting them.
Spiders produce silk from specialized organs called spinnerets. Different types of silk can serve different purposes, including supporting the web and capturing prey.
Our straw and pipe cleaner design is a simplified model of an orb web. Real spider webs are much more intricate and aren’t all built in the same pattern.
For a science extension, look at photographs of different spider webs and compare their structures.
What shapes and patterns do you notice? How are the webs similar or different?

Keep the Spider Web Learning Going! 🕸️
If your kids enjoyed building their own spider webs, try my Spider Web Fraction Game next! It’s a fun, hands-on way to explore fractions while keeping the spider theme going.

More Spider and Halloween Learning Activities
Children can learn about spider anatomy, investigate different types of webs, or go on a nature walk to look for real spider webs.
You might also enjoy these Halloween learning activities from Teach Beside Me:
- Candy Corn Fractions
- Spider Life Cycle for Kids + Free Printable Worksheets
- Candy Corn Slime
- Milk Jug Skeleton
- Glue and Salt Spiderweb Craft
- Halloween Spider Jell-O Jigglers
This straw and pipe cleaner spider web is such a fun combination of Halloween crafting and hands-on STEM learning. I love that kids can experiment, solve problems, and end up with a decoration they’re proud to display.
Give it a try and see what creative spider web designs your kids come up with!