Halloween Anatomy: Make a Milk Jug Skeleton
This post may contain affiliate links.

Halloween is the perfect excuse to learn a little anatomy! Save up your empty milk jugs and turn them into a giant milk jug skeleton that kids can build, study—and then hang up as a Halloween decoration.
We originally made this project while learning about the skeletal system, and it turned out to be such a fun way to combine science with a seasonal project. As kids assemble the skull, torso, pelvis, arms, and legs, they can compare their model with a real human skeleton and learn how the different parts of the skeletal system fit together.
And when the anatomy lesson is finished? You’ve got a pretty fantastic recycled Halloween decoration.

Make a Skeleton From Milk Jugs
You’ll need approximately 8–9 clean, empty gallon milk jugs for this project.
Start saving them ahead of time, or ask friends and neighbors to save a few for you.
Supplies
You’ll need:
- 8–9 clean gallon milk jugs
- Scissors
- Permanent marker
- Hole punch
- String
- Hot Glue Gun & Glue
Adult help is important for the cutting and hot-glue portions of this project. The cut edges of plastic can also be sharp, so check the pieces before kids handle them.
How to Cut the Milk Jugs Into Skeleton Bones
Before cutting, use a permanent marker to sketch the different skeleton pieces onto the milk jugs.
Here’s how we divided ours:
- 1 milk jug for the skull
- 1 milk jug for the torso
- Bottom third of 1 milk jug for the pelvis/hip area
- Side corners of approximately 3 jugs for 8 long limb pieces
- Sides of 2 jugs for the hands and feet
- Handles from 2 jugs for the shoulder pieces
The shapes don’t have to be anatomically perfect. The goal is to create a recognizable model that gives kids a chance to think about the basic structure of the human skeleton.
Lay out all of the pieces before assembling your skeleton so you can see how the body will fit together.

How to Assemble the Milk Jug Skeleton
Once all of the pieces are cut out, it’s time to build your skeleton.
Connect the Arms and Legs
Punch holes into the ends of the plastic bone pieces.
Use short pieces of string to tie the bones together at the joints.
Leaving a little room in the string connections allows the arms and legs to move.
Attach the Pelvis
Punch matching holes in the pelvis and lower portion of the torso.
We made four holes in each and tied the pieces securely together with string.
Add the Shoulders
The handles from the milk jugs make surprisingly good shoulder pieces!
Hot glue them onto the upper part of the torso.
Attach the Skull
To connect the head, carefully trim the opening at the top of the torso jug so the skull jug fits into it.
Secure it with hot glue.
Now your milk jug skeleton is ready to hang!

Turn It Into a Human Anatomy Lesson
Before hanging your skeleton up for Halloween, use it as a model for learning about the human body.
Compare your milk jug skeleton with my real skeletal system diagram.
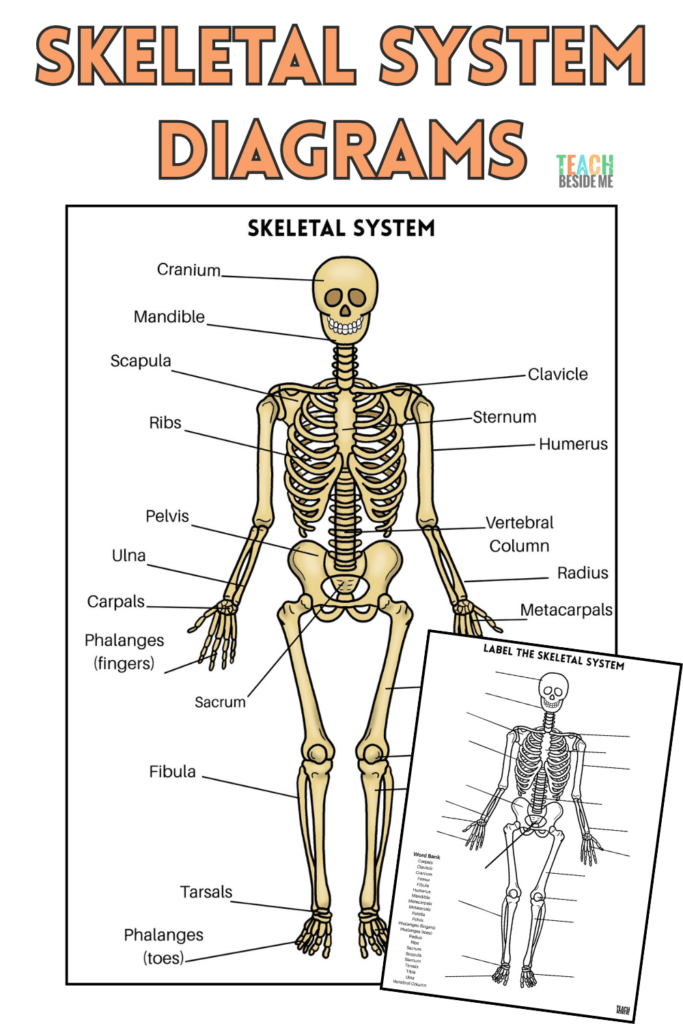
Can kids identify where these major bones or groups of bones would be?
- Skull
- Spine
- Rib cage
- Pelvis
- Humerus
- Radius and ulna
- Femur
- Tibia and fibula
Obviously, our milk jug version is a simplified model—it doesn’t have all 206 bones in the adult human skeleton!
That’s actually a great discussion point.
Ask kids:
What is missing from our model?
Look at the hands and feet, the spine, the rib cage, and the joints. Compare those areas with a detailed skeleton illustration.
That turns the project into an exercise in modeling and observation, rather than simply making a Halloween decoration.
How Do Our Joints Move?
The string connections also give you an easy way to talk about joints.
Have kids move the arms and legs of the finished skeleton.
Which parts of their own bodies bend in similar places?
Try bending your:
- Elbow
- Knee
- Wrist
- Ankle
- Shoulder
- Hip
Then compare those movements with the milk jug skeleton.
Can your model move in all the same ways your body can? Why or why not?

A Recycled Halloween Decoration
Once your anatomy lesson is over, don’t take the skeleton apart!
Hang it on a door, wall, porch, or somewhere around the house for a wonderfully goofy DIY Halloween skeleton decoration.
That’s one of my favorite things about this project: you’re reusing materials you would normally throw away, getting a hands-on anatomy lesson out of them, and ending up with a Halloween decoration.
Not bad for a pile of milk jugs.

More Human Anatomy Activities for Kids
If you’re studying the human body, continue the learning with some of our other hands-on anatomy activities:
- Skeletal System Diagram + Free Labeled Skeleton Printable
- Try a Skeleton Bone Sensory Bin from A Little Pinch of Perfect
- Check out Our Pretend Play: Anatomy Lab!
- Try some Play Dough Anatomy!
- Learn About x-rays with this: Playing Doctor- Doctor Play Set for Kids
- Make this Anatomy-themed Magic Folding Photo Cube for Kids
A Few Fun Anatomy Books We Love:
Also, be sure to check out our STEAM Kids Halloween book!


Wow, that is so creative!! I’m always looking for hands-on creative activities like these, because my kids are really hands on.