How to Make Stalactites and Stalagmites: Easy Geology Activity for Kids
This post may contain affiliate links.
If you’re looking for a meaningful geology experiment for kids, this stalactite and stalagmite formation activity is simple, low-cost, and incredibly fascinating to watch over time.
We’re lucky to live near Timpanogos Cave National Monument, where you can see stunning real-life stalactites and stalagmites up close. Seeing those towering mineral formations inspired us to recreate the process at home.
Living near the mountains has given us so many opportunities to explore geology in real life. Walking through the cool cave air and looking up at towering formations makes you feel tiny in the best way. My kids always ask, “How long did this take to grow?” When they hear “thousands of years,” it’s almost impossible to comprehend. That’s part of why I love recreating small-scale versions of big natural processes at home — it makes something massive and distant feel tangible.
This is a long-term science experiment — and that’s part of the magic.

What Are Stalactites and Stalagmites?
Stalactites and stalagmites are mineral rock formations that grow inside caves over thousands of years.
They form when rainwater drips through limestone rock, carrying dissolved minerals — most commonly calcium carbonate.
When the water evaporates, it leaves tiny mineral deposits behind. Over time, those deposits build up into the formations we see in caves.
The Difference:
-
Stalactites hang from the ceiling
-
Stalagmites grow upward from the ground or cave floor
A helpful memory trick:
Stalactites hold tight to the ceiling.
Stalagmites might reach the ceiling.
One of the most famous cave systems with these formations is Carlsbad Caverns National Park, where the formations are massive and breathtaking.

How This Experiment Models Cave Formation
In real caves:
-
Water carries dissolved minerals
-
Water drips from the cave ceiling
-
Minerals are left behind
-
Layers slowly build up
In our experiment:
-
The string carries mineral-rich water
-
Water drips down
-
As it evaporates, crystals form
-
Over weeks, the formations grow
We’re modeling the same process in this demonstration, just faster.

How to Grow Stalactites and Stalagmites at Home
Supplies
-
4 glass jars
-
Cotton string or yarn (must be absorbent)
-
4 large paper clips
-
Baking soda
-
Hot water
-
Tray (important!)

Step 1: Make a Saturated Solution
Fill two jars with hot water for baking soda.
Fill two jars with hot water for Epsom salt.
Use a spoon to stir in as much baking soda or salt as possible until it stops dissolving.
When no more dissolves, you’ve made a saturated solution.
This is critical for crystal growth.

Step 2: Prepare the String
Cut two long pieces of cotton string.
The string will:
-
Absorb the solution
-
Carry it upward
-
Allow it to drip into the center
Tie a paperclip to each end of the strings so it stays submerged.

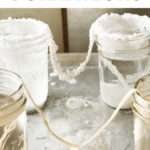
Step 3: Connect the Jars
Place two jars close together.
Drape the string between them so it:
-
Sits in both jars
-
Hangs down in the center
Put a tray underneath to catch dripping water.
Repeat for both mixtures (salt and baking soda).

Step 4: Observe Over Time
Leave the experiment undisturbed for 2–3 weeks.
You may need to:
-
Add more solution if liquid levels drop
-
Check growth daily
Patience is part of the lesson.

Results: Baking Soda vs Salt
Baking Soda
-
The baking soda solution grew quickly
-
Formed widespread crystalized formations and buildup
-
Less defined stalagmite growth

Epsom Salt
-
Slower growth
-
Formed more traditional stalactite shape
-
Eventually connected top to bottom
Interestingly, when our salt formation connected to the tray, it resembled a real cave column. It reminded us of an icicle.

The Science Behind It
This experiment demonstrates:
-
Evaporation
-
Crystallization
-
Saturated solutions
-
Mineral deposition
-
Capillary action (water moving through the string)
In caves, the process takes thousands of years.
In your kitchen, it takes weeks.
In real limestone caves, rainwater absorbs carbon dioxide from the air and soil, forming a weak carbonic acid. As that water seeps through limestone rock, it dissolves calcium carbonate. When the mineral-rich water reaches the cave ceiling and drips downward, carbon dioxide escapes into the cave air, and the calcium carbonate solidifies again — building layer upon layer over time.
Our experiment doesn’t use limestone, but it models the same core principles: dissolved minerals carried by water are left behind when the water evaporates. The result is crystal growth that mimics natural cave formations.
Learning Extensions
Ask:
-
Why did one grow faster?
-
What happens if we increase concentration?
-
Does temperature affect growth?
-
What would happen in a humid environment?
You can even measure growth height each day and graph it.
What to Observe Each Day
Encourage kids to look for:
-
Where crystals begin forming first
-
How the drip point changes over time
-
Whether the stalactite and stalagmite grow at the same rate
-
Changes in crystal texture or color
Have them measure growth with a ruler or take daily photos to compare progress. Watching the gradual buildup helps children understand that many natural processes are slow and cumulative — not instant.
Watching these stalactites and stalagmites slowly grow over time is such a powerful reminder that science often happens gradually. What looks like a simple drip of water can, over thousands of years, create massive and breathtaking cave formations. This experiment gives kids a small glimpse into that incredible natural process, and builds patience, observation skills, and curiosity along the way.
If you try it, let it sit, check it daily, and enjoy watching geology happen right on your kitchen counter!
More Geology Science for Kids:
Printable Geology Rock Cycle Game


