DIY Clay Garden Markers (Easy Plant Labels for Kids)
This post may contain affiliate links.
Looking for a simple and beautiful way to label your garden this spring? These DIY clay stamped garden markers are one of my favorite garden projects to make with kids. They’re easy, creative, and actually useful all season long.
Plus, they add such a charming, handmade touch to your garden beds.
Why Make Garden Markers?
If you’ve ever planted a garden and then completely forgotten what went where… you’re not alone. Plant identification can definitely be a problem, especially for new gardeners!
Garden markers help:
- Keep track of what you planted
- Teach kids about plant names and gardening
- Add a decorative element to your space
And when kids help make them? They feel even more connected to the garden.

Supplies You’ll Need
- Polymer clay (like Sculpey or similar)
- Alphabet stamps (or letter stamps)
- Rolling pin
- Knife or clay cutter
- Paint (watercolors or acrylic)
- Clear sealant or glaze
Can You Use Air Dry Clay for Garden Markers?
Yes, you can use air dry clay instead of polymer clay, but keep in mind that it is less durable outdoors. If using air dry clay, be sure to seal it with multiple coats of a waterproof sealant to help protect it from moisture. For long-term outdoor use, polymer clay tends to hold up better in garden conditions.
How to Make Clay Garden Markers
1. Roll the Clay
Knead the clay until soft, then roll it out evenly to about ¼ inch thick.
2. Cut Into Shapes
Cut the clay into long strips with a pointed bottom so they can easily go into the soil.
Make them wide enough to fit your stamped words.

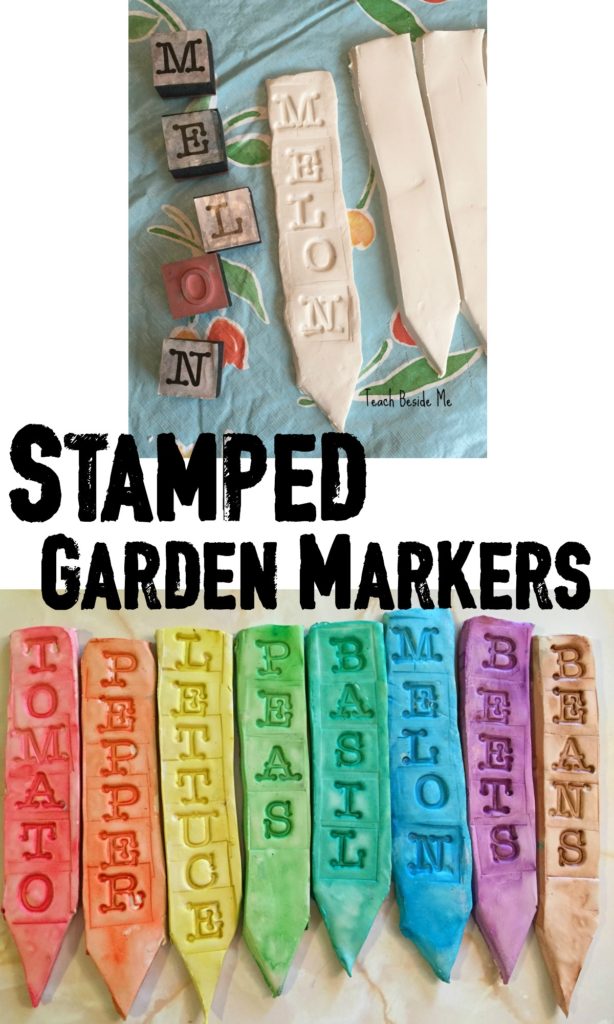
3. Stamp the Names
Use letter stamps to spell out your plant names. You can customize based on what labels you need for your own garden.
Not sure what to label? Garden markers are a great opportunity to help kids learn plant names and organize your space at the same time. You can label vegetables, herbs, or even flowers depending on what you’re growing.
Some ideas for your plant markers:
- Tomato
- Basil
- Lettuce
- Peas
- Carrots
- Beans
- Melon
- Basil
- Oregano
- Zucchini
If you’re planting with younger children, keep it simple with easy-to-read words or even add small symbols or drawings next to the names. For older kids, you can turn it into a mini lesson by discussing how each plant grows, how long it takes to harvest, and what it needs to thrive.
Press the stamp firmly into the clay so the letters are easy to read after baking.

4. Bake the Clay
Bake according to your clay package directions
(usually around 250°F for 7–10 minutes per ¼ inch thickness).
Let them cool completely.

5. Paint Your Garden Markers
Once cooled, paint your garden markers.
- Watercolors = soft, natural look
- Acrylic paint = brighter, bolder colors
6. Seal for Outdoor Use
Add a clear glaze or sealant to protect your markers from water and weather.
This step is important so your designs last all season.

Try my Garden Growth Chart
7. Add to Your Garden
Place your finished markers into the soil next to each plant.
Now your garden is labeled—and adorable.

Why This Is a Great Activity for Kids
This project is more than just a craft—it’s a learning experience.
Kids practice:
- Fine motor skills (rolling, stamping, shaping)
- Reading and spelling plant names
- Responsibility and care for a garden
It’s a perfect blend of art + nature + hands-on learning.

Tips for Success
- Keep clay thickness even so they bake properly
- Don’t make them too thin—they can break in soil
- Seal well if you plan to water frequently
- Store extras indoors if you want them to last longer
Will These Garden Markers Last Outside?
With proper sealing, these clay garden markers can last through an entire growing season. However, extreme moisture, heavy rain, or freezing temperatures may cause wear over time. For best results, apply a waterproof sealant and consider bringing them inside at the end of the season to reuse next year.
Fun Variations to Try
Want to take this project a step further?
- Add simple designs (leaves, flowers, dots)
- Use cookie cutters for shaped markers
- Press in textures (lace, burlap, leaves)
- Color-code plants (greens for herbs, red for tomatoes, etc.)
A Simple Spring Garden Project
There’s something so satisfying about making something with your hands and then seeing it used every day in your garden.
These clay garden markers are simple, meaningful, and a perfect way to welcome the spring season.
See More Spring Garden Ideas:
- Garden Ten Frame Printable Math Activity
- Kids Gardening Math: Growth & Measurement
- Printable Garden Alphabet Cards
- How to Plant Seeds with Kids
- Grow a Seed in a Bag & Plant Life Cycles
![]()


