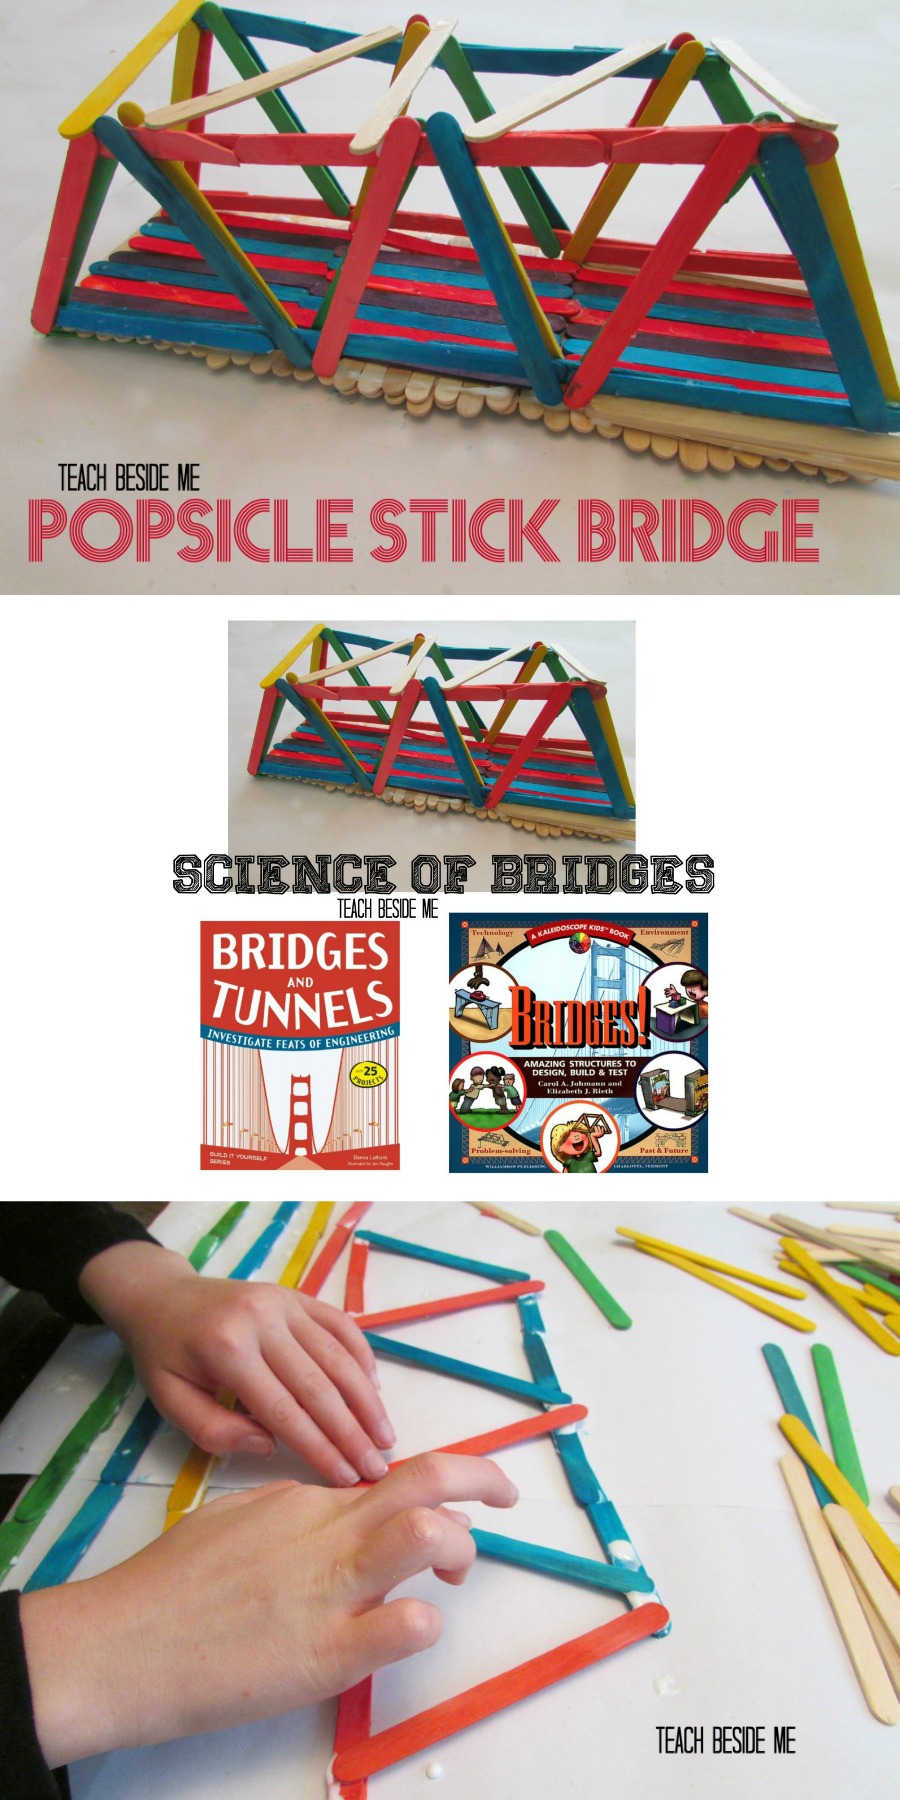
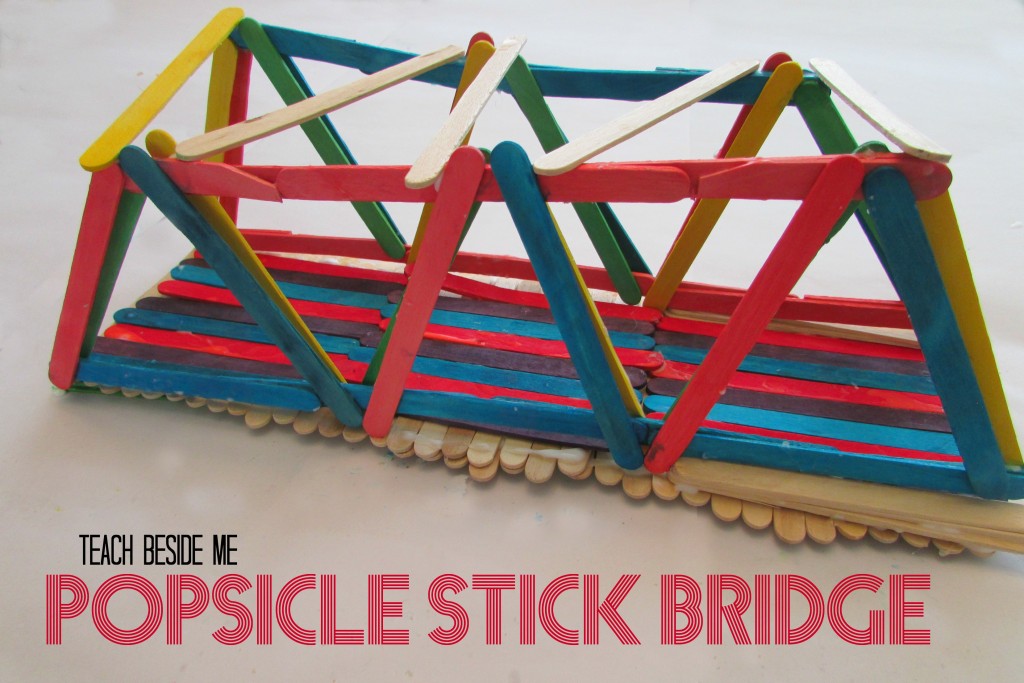
Popsicle Stick Bridge STEM Project: Engineering for Kids
This post may contain affiliate links.

Building a popsicle stick bridge is a fun and engaging STEM engineering project that teaches kids about structures, weight distribution, and problem-solving. This hands-on activity is great for introducing basic engineering concepts while allowing kids to design, construct, and test their own miniature bridges.
Want a simpler bridge without glue? Try this one! Also check out my Paper Bridge STEM Engineering experiment!
Why Build a Popsicle Stick Bridge?
Bridge building is an excellent STEM challenge because it demonstrates how structure affects strength. Engineers design bridges carefully to withstand weight, pressure, and environmental factors. With this project, kids can experiment with different bridge types, explore geometry and physics, and even test the strength of their designs!
- Teaches engineering and physics principles
- Encourages creativity and problem-solving
- Hands-on learning experience for all ages
- Great for STEM competitions and classroom challenges
Bridge building is a great STEM engineering project for students. It is a simple way to teach about how important structure is to strength. You can build a bridge many different ways, and they will not all be equal. Take this bridge building project a step further by competing with other bridges to see which one hold up the most weight.
Yes, our popsicle bridge is messy and crooked, but my kids had a blast making it and it is strong!
Materials Needed:
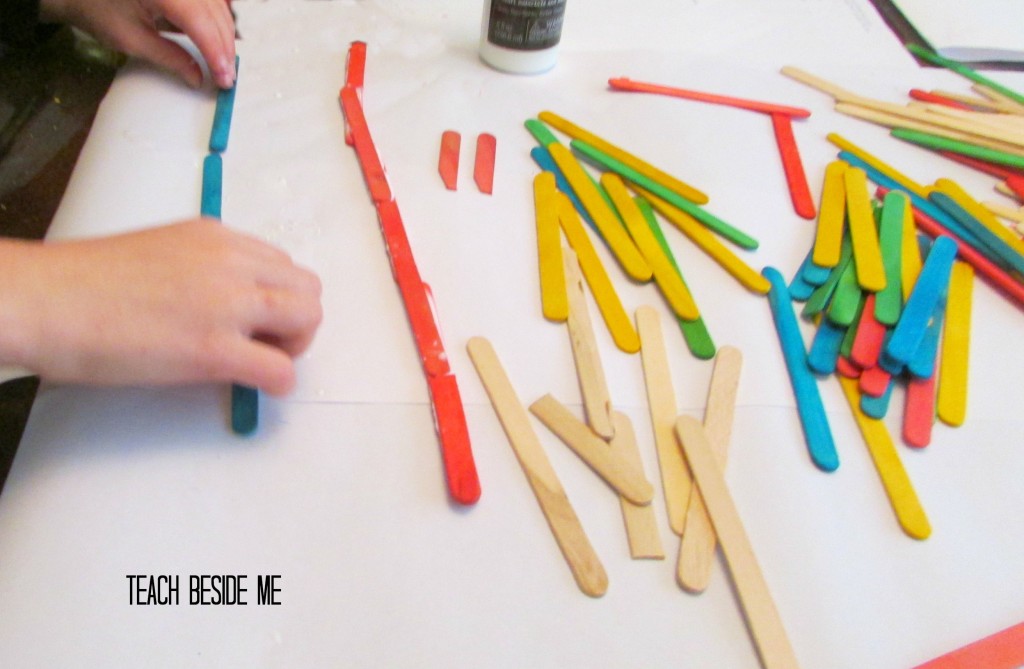
- Popsicle sticks (craft sticks) – at least 100
- Strong glue (Elmer’s X-Treme School Glue, wood glue, or hot glue)
- Sharp scissors or shears (to cut sticks if needed)
- Ruler and pencil (for sketching a design)
- Newspaper or paper plate (to protect your workspace)
- Books, clamps or binder clips (to hold pieces while drying)
- Hot glue gun if using that instead
Prepare your workspace by laying down some newspaper or a paper plate. It will get messy!

How to Build a Popsicle Stick Bridge
Step 1: Plan Your Bridge Design
Before starting the tutorial, decide on the type of model bridge you want to create. Today bridges are not just about function, but aesthetics, too! There are several types of bridges used in engineering, including:
- Truss Bridge (uses triangles for strength)
- Beam Bridge (simplest structure)
- Arch Bridge (curved for support)
- Suspension Bridge (cables hold it up)
- Cantilever Bridge (supported on one end)
- Cable-Stayed Bridge (modern suspension style)
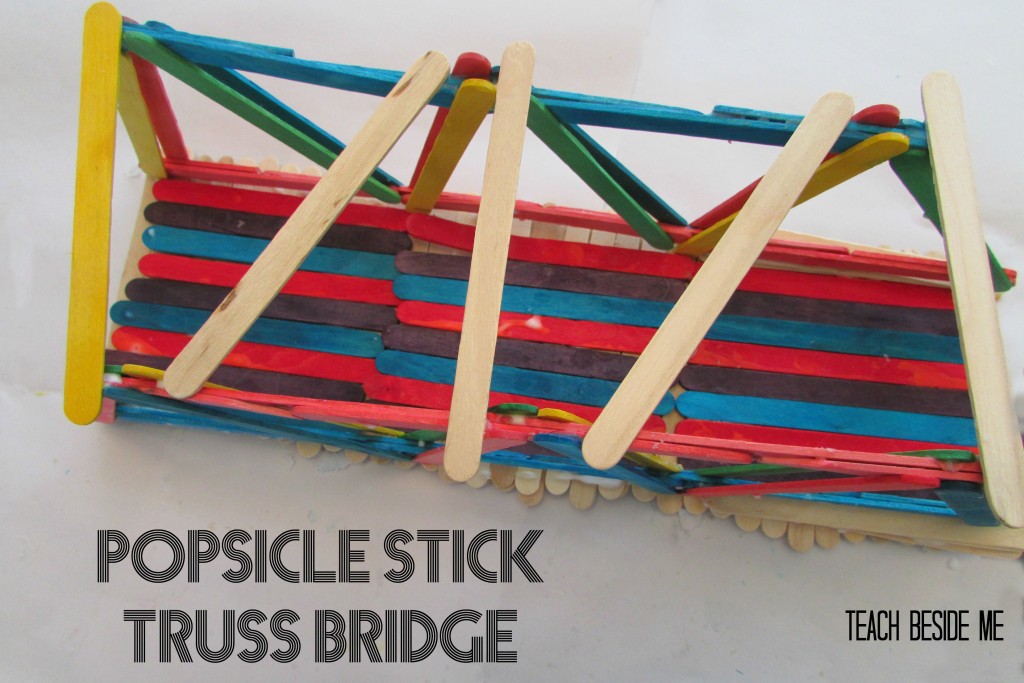
For this project, we built a Warren Truss Bridge, which uses equilateral triangles to evenly distribute weight, making it very strong.
Grab a ruler and pencil and sketch your bridge design or blueprints on paper to visualize the structure before assembling it. Figure out the dimensions of the bridge you want to build. Decide on the length of your deck, the width of the deck, how tall the walls of your trusses will be, etc. Then decide the number of sticks you will need to build it.
Try it with jumbo popsicle sticks and make it even bigger!
Step 2: Build the Base of the Bridge
These are the instructions for the construction of the truss bridge that we made.
- Line up three popsicle sticks end to end.
- Glue two more sticks on top, overlapping the seams to create a reinforced base.
- Cut one popsicle stick in half and use the halves to reinforce the edges.
- Repeat these rows of popsicle sticks three more times to make a total of four base sections.
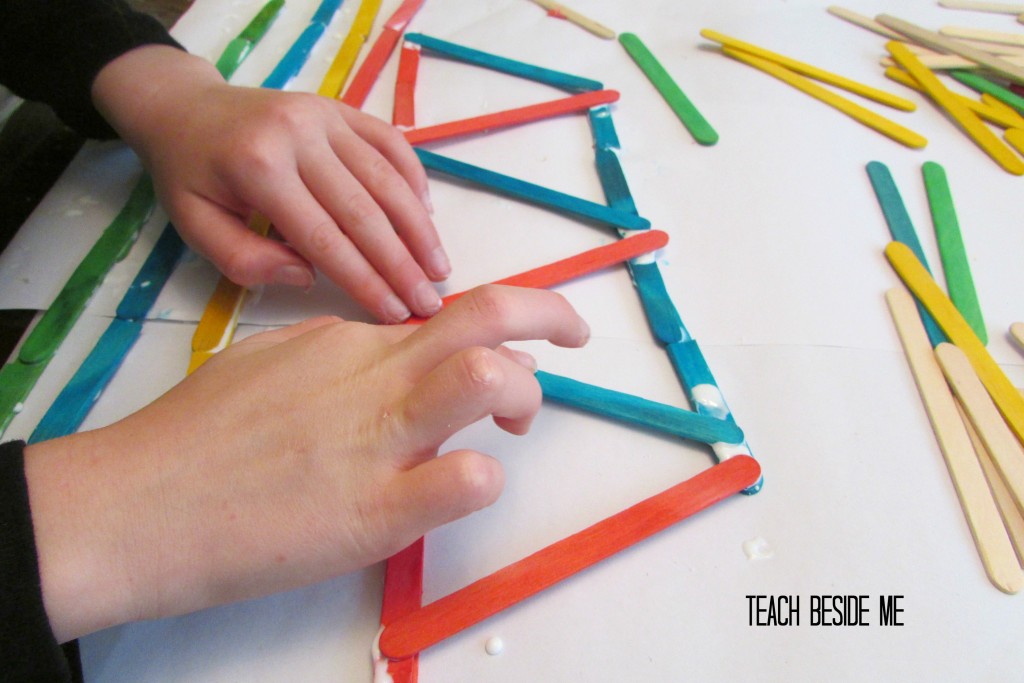
Step 3: Construct the Trusses (Side Supports)
- Take two popsicle sticks and glue them together to create a shorter beam.
- Use this beam and your longer three-stick beam to form triangles along the length of the bridge.
- Allow the glued popsicle sticks to dry for 15 minutes, then flip it over and reinforce it by repeating the triangular pattern.
- Make two identical truss structures (one for each side of the bridge).
Step 4: Assemble the Bridge Structure
- Place the base pieces parallel to each other.
- Glue sticks across the bottom to create the bridge’s roadway.
- Attach the trusses (side supports) to the base by gluing them upright along the edges.
- Use clamps or books to hold the sides in place while drying.
- Add cross beams across the top for extra stability.
Let the bridge dry completely so it is stable before testing its strength!
STEM Challenge: Test Your Bridge’s Strength!
Once your popsicle stick bridge is built, it’s time to test its strength! Here are some fun ways to experiment:
- Stack books or small weights on top to see how much weight it can hold.
- Place toy cars or small objects on the deck or the walkway bridge to simulate real-life use.
- Compare different bridge designs (truss, beam, arch) to see which one is the strongest.
- Modify and improve your design to make it stronger or more aesthetically pleasing.
Our bridge ended up pretty lopsided, but it still held together amazingly well! My daughter filled in the uneven parts along the bottom with some extra sticks to keep it balanced. This also made it into a much stronger bridge. She was SO proud of her creation!
Engineering Concepts Learned in This Project
- Load Distribution: How weight is spread across a structure.
- Forces & Stability: Bridges must resist compression and tension.
- Geometry & Shapes: Triangles are one of the strongest shapes in engineering.
- Testing & Refining: Engineers test and improve their designs, just like in this project!
Take this project a step further to see how much weight it will hold.
This popsicle stick bridge STEM project combines both science and mathematics!
STEM Concepts in Popsicle Stick Bridge Engineering
A Brief History of the Truss Bridge
The truss bridge has been used for centuries due to its strength and durability. The concept dates back to the early 19th century, with engineers like Ithiel Town and Squire Whipple pioneering truss designs that improved bridge construction. The use of triangular trusses helps distribute weight evenly, making them ideal for carrying heavy loads. Today, truss bridges are used in railways, highways, and pedestrian walkways worldwide.
- Load Distribution: How weight is spread across a structure.
- Forces & Stability: Bridges must resist compression and tension.
- Geometry & Shapes: Triangles are one of the strongest shapes in engineering.
- Testing & Refining: Engineers test and improve their designs, just like in this project!
Frequently Asked Questions (FAQ) About Popsicle Stick Bridges
How many popsicle sticks do I need to build a bridge?
Most designs require between 50-150 craft sticks, depending on the bridge type and size.
What glue works best for a popsicle stick bridge?
For a strong bridge, use wood glue, hot glue, or Elmer’s X-Treme School Glue.
What is the strongest type of bridge to build with popsicle sticks?
A truss bridge is one of the strongest designs because it distributes weight evenly using triangles.
How can I test my popsicle stick bridge’s strength?
Try placing books, weights, or toy cars on your bridge to see how much weight it can support!
I think this may be the STRONGEST Popsicle Stick Bridge out there!
Take It Further: Bridge STEM Books & Activities
Learn more about engineering and how real bridges are built with these cool books:

Bridges and Tunnels by Donna Latham & Bridges! by Carol A. Johmann
Also check out my Fairy Tale STEM project with the Three Billy Goats Gruff for another idea to make a popsicle stick bridge.
Try this Paper Bridge: Easy Engineering Experiment!
See more science projects for kids.
Building a popsicle stick bridge is a fantastic way to introduce kids to engineering, physics, and problem-solving. Whether you’re doing this project at home or in the classroom, it’s a great STEM challenge that encourages creativity and critical thinking.
How strong was your bridge? What kind of bridge did you make? Share your results in the comments!


thats cool my group loved the way yall did it