STEM Challenge: How to Make a Solar Powered LEGO Car
This post may contain affiliate links.
Can you build a solar powered LEGO car that actually moves?
We decided to find out—and after plenty of experimenting, troubleshooting, and creative problem-solving, we finally got it working! This turned into one of our favorite LEGO STEM projects because it combined engineering, renewable energy, and a healthy dose of perseverance.
If you have LEGO-loving kids who enjoy building challenges, this project is a fantastic way to explore solar energythrough hands-on learning.
It’s also a perfect activity for Earth Day, science fairs, STEM clubs, homeschool lessons, or just a fun weekend engineering project.
Looking for more LEGO engineering ideas? Be sure to check out our LEGO Balloon Powered Car as well!

What You’ll Learn
This solar powered LEGO car introduces children to important STEM concepts, including:
- Renewable energy
- Solar power
- Simple machines and gears
- Engineering design
- Problem-solving
- Trial and error
- Perseverance through failure
One of the best parts of this project is that it doesn’t work perfectly the first time. Kids get to experience the real engineering process: testing, redesigning, and improving.
Supplies Needed
To build your own solar powered LEGO car, you’ll need:
- LEGO bricks and plates
- LEGO wheels and axles
- LEGO gears
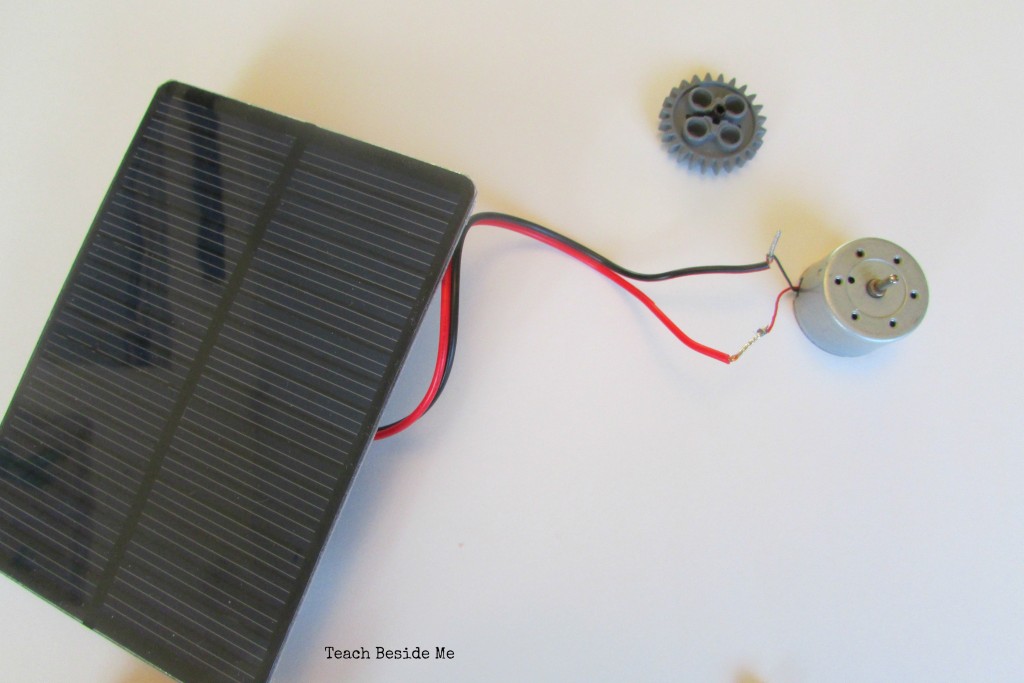
- 9V solar panel with attached wires
- Mini 6V motor with wires attached
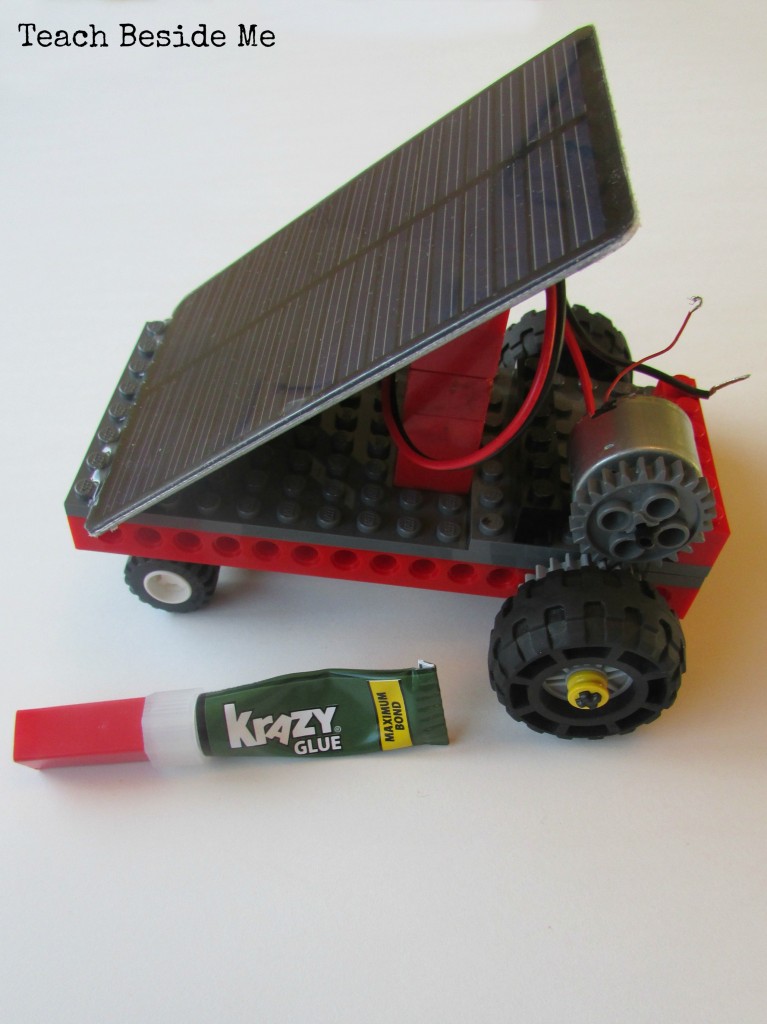
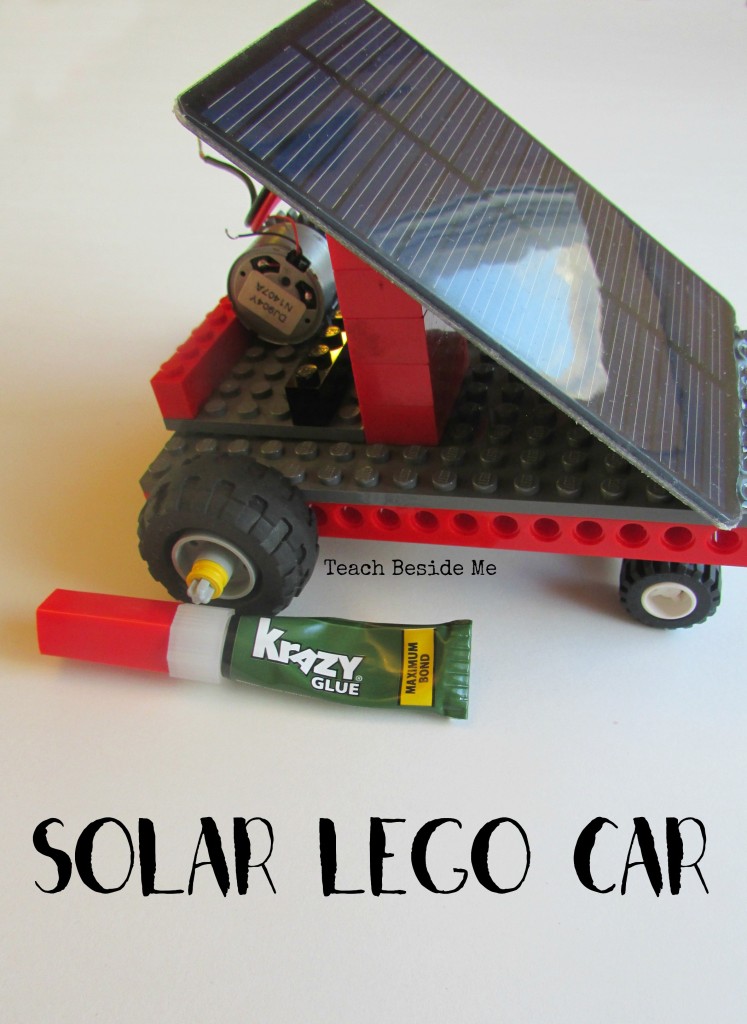
- Extra-strong glue like Krazy Glue
- Small tubing piece (optional)
- Axle connectors (optional)

How to Build a Solar Powered LEGO Car
Step 1: Build the LEGO Car Base
Start by creating a sturdy LEGO vehicle frame.
We used:
- A long baseplate
- Smaller wheels in the front
- Larger wheels in the back
Your design doesn’t have to match ours exactly. Encourage kids to experiment with different layouts and wheel sizes.

Step 2: Attach the Solar Panel
Build a support structure near the front of the car to hold the solar panel at an angle.
Secure the panel in place using a strong adhesive if needed.
Make sure the panel will receive plenty of direct sunlight when the car is operating.

Step 3: Secure the Motor
Build a small platform near the rear axle to hold the motor.
The motor will provide the rotational force needed to move the wheels.
Attach it securely so it doesn’t shift during testing.

Step 4: Connect the Gears
This was definitely the trickiest part of the entire project!
We used LEGO Technic pieces with holes to hold the axles and gears in place.
One gear was attached to the rear axle, while a second gear connected the motor to the wheels.
Because the motor shaft was smaller than the LEGO gear opening, we improvised by using a small piece of tubing to create a snug fit.
Engineering often requires creative problem-solving!
Step 5: Connect the Axles
If you don’t have a long enough axle, axle connectors can be used to join shorter pieces together.
We even had to modify our design several times before finding a solution that worked.
Step 6: Test Your Car
Place the car in direct sunlight.
The solar panel converts light energy into electrical energy, which powers the motor and turns the gears.
If your car doesn’t move immediately, don’t give up! We found that adjusting the gear alignment and improving sunlight exposure made a huge difference.
Troubleshooting Tips
If your solar powered LEGO car isn’t moving, try these suggestions:
Check the sunlight.
Bright, direct sunlight works best.
Inspect the gear connections.
Gears should mesh smoothly without slipping.
Verify the motor and solar panel compatibility.
A motor that requires too much power may not work with a smaller solar panel.
Reduce friction.
Make sure the wheels spin freely.
Keep experimenting.
Real engineers rarely succeed on the very first attempt!
The Science Behind Solar Power
Solar panels contain materials called photovoltaic cells.
These cells convert energy from sunlight into electricity.
The electricity then travels through the wires to power the motor.
The motor transforms the electrical energy into mechanical energy, causing the gears and wheels to move.
This project demonstrates an energy transformation sequence:
Sunlight → Electrical Energy → Mechanical Energy → Motion
Why This Is a Great STEM Project
This activity combines multiple STEM disciplines:
Science
Explore renewable energy and energy transfer.
Technology
Use motors and solar panels to solve problems.
Engineering
Design, test, and improve a working vehicle.
Math
Measure, compare, and analyze different design choices.
Most importantly, children learn that failure is part of the learning process. Our first version didn’t work. Neither did the second. But when those wheels finally started turning, we celebrated like we’d just launched a rocket!
Explore More Solar Energy Activities
Keep the learning going with these hands-on activities that demonstrate the amazing power of the sun:
- Make a Solar Still – Discover how sunlight can evaporate and collect water while exploring the water cycle.
- Cook Solar S’mores – Harness the sun’s heat to make a delicious treat while learning about renewable energy and heat transfer.
- Create Solar Prints – Explore how UV light can be used to make beautiful artwork in this engaging activity from The Homeschool Scientist.
These activities pair perfectly with this solar powered LEGO car to create an exciting unit study all about solar energy and the many ways we use the sun in everyday life.
More LEGO STEM Activities
If your kids love building with LEGO bricks, try these projects next:
LEGO building activities are a wonderful way to combine creativity with engineering, helping children discover that some of the best learning happens when we experiment, take risks, and keep trying.


This is so neat! My boys would love this. What a fun hands on science lesson.
This is awesome! I’ll have to pin it for my boys! It was so nice meeting you this weekend at the conference, can’t wait to check out even more craft ideas! =)
Thanks, Jennie! It was so nice to meet you, too!
Oh, that looks like fun! My son like the k’nex motors, but they’re on the wimpy side. I wonder if we could figure out a way to use a motor with more juice…
NO WAY!!! I know what we’re doing this week! Thank you!
Where did you buy the solar panel and motor?
Just on Amazon. They are linked in the post.
Is there a kit with the legos in it?
The link for the motors show that they are unavailable to order. I brought a pack that has 5 1-6v motors. I connected one motor to the solar panel but it’s still not working. What am I doing wrong? The motor?
I have motors from XMODS cars. Will that work?