Fun Rainbow Science: Sugar Density Experiment!
This post may contain affiliate links.

Looking for a colorful and engaging science experiment? This Rainbow Sugar Density Experiment is a must-try! It’s a simple yet fascinating way to explore the concept of density using sugar, water, and food coloring. Kids will love watching the vibrant layers form, and it’s a great way to introduce STEM learning at home or in the classroom.
This experiment is a fun and educational way to teach density, concentration, and buoyancy—all while creating a beautiful rainbow effect. Plus, it only requires a few simple ingredients you likely already have in your kitchen!
See more Rainbow Science Experiments.
What Is the Sugar Density Experiment?
The key to this experiment is understanding that liquids with different densities don’t easily mix. By dissolving different amounts of sugar into each layer, you create solutions with increasing density. The more sugar a solution has, the denser it is, which allows it to layer instead of mixing!
Why Kids Love This Science Experiment
- It’s colorful and visually exciting
- It teaches key science concepts in a hands-on way
- It’s a low-cost and easy experiment using household supplies
- It’s a perfect STEM activity for homeschool, classrooms, or fun learning at home
This science project idea came from our Steve Spangler Science kit that we get monthly. I got this subscription for my son for school this year and it has been such a great investment. I highly recommend them! (See also my post about the Gravity Beads experiment from Steve Spangler, another huge hit!)
How to Do the Rainbow Sugar Density Experiment
Watch it:
Supplies needed:

1 Box of sugar cubes
6 Small clear plastic cups
Food coloring (with our kit we got colored tablets, but any coloring will work)
Large 10 mL syringe
Water
If you don’t have sugar cubes, no problem! One sugar cube is equal to 1 tsp or about 4 grams.

Step-by-Step Instructions
Step 1: Prepare the Cups
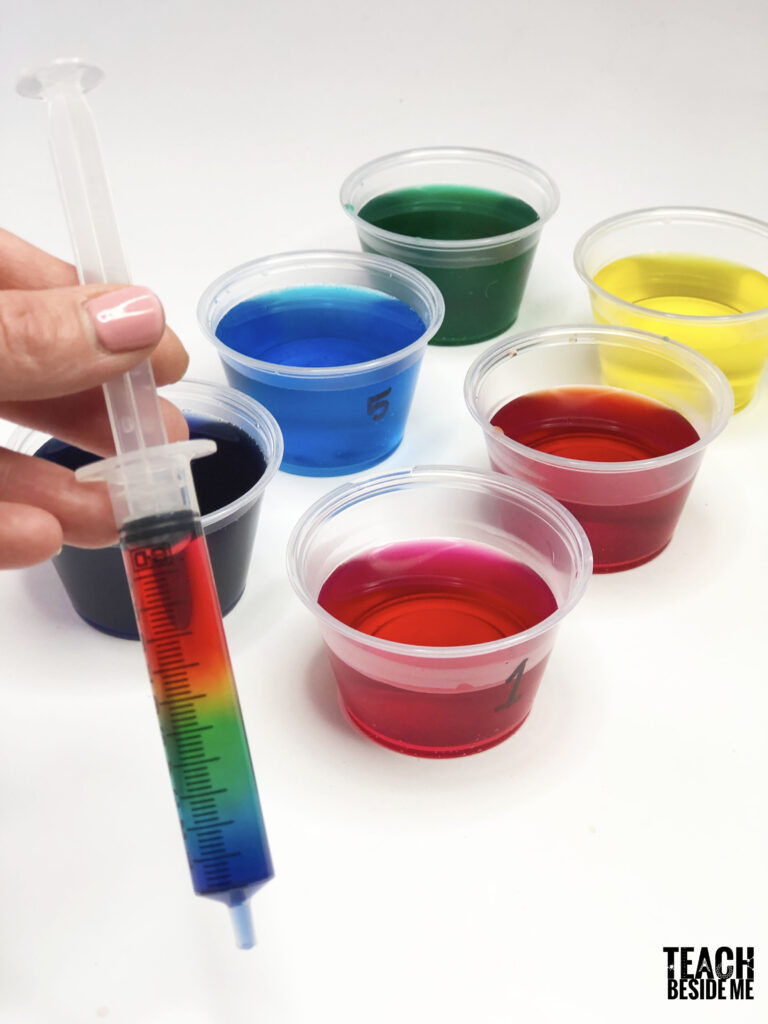
Number your cups from 1 to 6.
Add 3 ounces of warm or hot water (about ⅓ cup) into each cup.
Why use warm water? It helps the sugar dissolve faster!
Step 2: Add the Colors
Create a rainbow of colors by adding food coloring to each cup:
- Cup #1: Red
- Cup #2: Orange (Mix Red + Yellow)
- Cup #3: Yellow
- Cup #4: Green
- Cup #5: Blue
- Cup #6: Purple (Mix Red + Blue)

Step 3: Add Sugar to Create Density Differences
Each cup will have a different amount of sugar changing the density of the water:
- Cup #1: No sugar (least dense)
- Cup #2: 3 sugar cubes
- Cup #3: 5 sugar cubes
- Cup #4: 7 sugar cubes
- Cup #5: 9 sugar cubes
- Cup #6: 11 sugar cubes (most dense)
Stir well until the sugar dissolves completely in each cup. The increasing amounts of sugar make each solution denser than the previous one.
Step 4: Layer the Colors Using a Syringe
Start with Cup #1 (Red, No Sugar) and draw 2 mL of liquid into the syringe.
Slowly add Cup #2 (Orange, 3 Sugar Cubes) on top.

Continue layering in order: Yellow → Green → Blue → Purple.
Tip: Add the liquid slowly down the side of the container to prevent mixing.
The layers will stay separated and make a rainbow of colors!

Try slowly flipping the syringe and the order of the colored sugar solutions will reverse!

Why Does This Work? The Science Behind It!
This experiment works because of density—the measure of how much mass is packed into a given volume.
- The more sugar dissolved in the water, the denser the liquid.
- Denser liquids sink, while less dense liquids float on top.
- This is why your colors stay in separate layers instead of mixing!
Fun Fact: The same principle applies to real-world examples like the ocean, where saltwater is denser than freshwater!
Fun Variations to Try
Layer It in a Jar!
Instead of a syringe, use a tall, clear jar and carefully pour each layer down the side using a spoon.
Try it on a Larger Scale!
Use a turkey baster instead of a syringe.
Experiment with Different Liquids!
Try using honey, olive oil, corn syrup, rubbing alcohol, or dish soap to see how their densities compare to sugar water!
Make a Hypothesis!
Before starting, ask kids to predict what will happen when they add more sugar.
Try some other fun density activities:
Density Experiment for Kids
Sink or Float: Density of Salt Water

The Rainbow Sugar Density Experiment is a fascinating and colorful way to teach kids about science in an engaging way. It’s a perfect hands-on learning activity that combines fun, creativity, and education!
Have you tried this experiment? Let me know in the comments! And be sure to check out more Rainbow Science Experiments for even more fun!