DIY Fabric Roads for Cars & Trucks
This post may contain affiliate links.
Looking for a fun, creative way to keep your little car and truck lovers entertained? These homemade fabric roads for kids are a perfect hands-on activity that combines imagination, fine motor development, and open-ended play. This project is simple to make, durable, washable, and perfect for rainy days, road trip fun, or everyday play at home.
Whether you’re setting up a playroom, building a portable quiet time kit, or just want to extend the life of your toy cars, this DIY road system is an engaging and budget-friendly way to bring hours of play to your home or classroom.
Why Make Fabric Roads?
Fabric roads are a fantastic alternative to bulky plastic playsets or taped tracks on the floor. They:
-
Encourage open-ended and creative play
-
Promote spatial reasoning and motor planning
-
Support STEM play when paired with building blocks and toy vehicles
-
Are easy to store, washable, and travel-friendly
-
Can be pieced together like a puzzle for ever-changing layouts
Best of all, you can customize them with whatever fabric scraps you have on hand—denim is especially durable!
Supplies to Make Fabric Roads
Here’s what you’ll need to make your own fabric roads:
-
Old denim jeans or sturdy fabric (like canvas or felt)
-
Gold or white thread (or fabric paint)
-
Scissors or rotary cutter
-
Sewing machine (optional)
-
Fray-check or fabric glue (if you don’t sew)
-
Ruler or measuring tape
-
Chalk or fabric pen for marking
The book we read for this theme was Goodnight, Goodnight, Construction Site by Sherri Duskey Rinker and Tom Lichtenheld. It is a darling story for all of the car & truck lovers in your life. It tells of all the different construction vehicles and what their jobs are. You say goodnight to each of the trucks as they finish their work for the day.

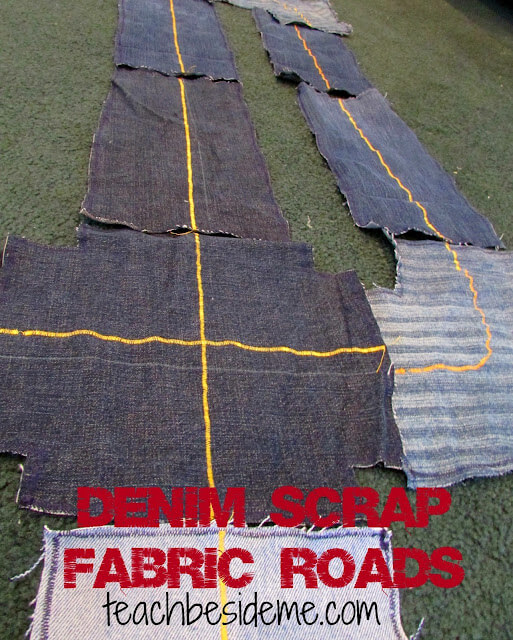
How to Make the Fabric Roads
Cut Your Road Pieces
Cut your fabric into 6-inch wide strips and shapes. Start with these basics:
- Straight road segments (6 x 12 inches)
- Curved pieces or corner turns
- 4-way intersections
- T-junctions or dead ends

Prevent Fraying
If you’re using denim or any woven fabric, finish the edges with a zig-zag stitch or serger. If you don’t sew, fabric glue or Fray-Check will work too.

Add Road Markings
Use gold thread (or white for more contrast) to sew a dashed center line down the middle of each road. You could also use yellow fabric paint or even a fabric marker for a no-sew version.
Customize!
Add stop signs, pedestrian crossings, or parking spots with paint, heat transfer vinyl, or iron-on patches. Kids can even help design their own pieces!

Learning Through Play
This project supports early childhood development and STEM learning by allowing kids to:
-
Practice problem-solving while designing road layouts
-
Explore basic engineering and city planning concepts
-
Work on visual motor coordination while lining up pieces and maneuvering vehicles
-
Count, sort, and categorize cars and road types
Pair these roads with building blocks or construction sets to create entire cities or work zones, expanding the play and learning opportunities.

Age-Appropriate Play Ideas
-
Toddlers: Practice driving toy cars back and forth, matching road pieces by shape.
-
Preschoolers: Build towns or neighborhoods, adding houses and stop signs.
-
Early Elementary: Use road pieces for storytelling, or design maps and challenges like “fastest route” games.
Bonus Tip: Make It Portable
Store all your road pieces in a tote or bin to create a grab-and-go quiet time activity for waiting rooms, church, or travel. You can even add a small roll-up fabric mat and a zippered pouch of cars to complete the kit.

Add a Book to Extend the Learning
Pair your DIY roads with a favorite transportation-themed book to turn this into a complete educational activity. A few favorites:
Making your own fabric roads is a low-cost, high-fun project that’s perfect for car-obsessed kids and creative caregivers. Whether you sew them yourself or use fabric glue, these road mats are a long-lasting addition to your playroom or homeschool space.


Those are really cute roads; and such a good way to use jeans that can’t be worn any more!
That is a GREAT idea! And portable! Pinning! We love that book too. 🙂
I haven’t seen this book. Looks like it would be right up my 3 yr old’s alley.
I’m a fan of your blog! I’m reading.
We have loved our “nature school” and THANK you for organizing it! AND you are lovely.
I *love* those roads! I’m going to share it on my PreschoolPowolPackets Facebook page–thanks for linking up at Teach Me Tuesday at Preschool Powol Packets!
How sweet are those fabric roads Karyn :-)What a creative idea! I can remember reading that book with my son when he was younger.
I can just imagine how LONG it took to zig zag all of those yellow lines.
Love that the roads are reusable and adjustable!
Thanks for linking up at Artsy Play Wednesday. Pinned it to our group board.
Thanks for linking this great idea to Tuesday Tots. I’ve featured it this week 🙂