
How to Make a Hydraulic Elevator: A Hands-On STEM Engineering Project
This post may contain affiliate links.
Can you build a working elevator using popsicle sticks, syringes, and water? Yes! This hydraulic elevator STEM project is a fun, hands-on engineering challenge that actually moves up and down as you push and pull a syringe.
Kids can explore how hydraulic systems transfer force, experiment with a scissor-lift mechanism, and discover how engineering makes everyday machines work.
We first explored hydraulics when we built a hydraulic hand with a Tinker Crate. The kids loved it so much that we wanted to try another project!
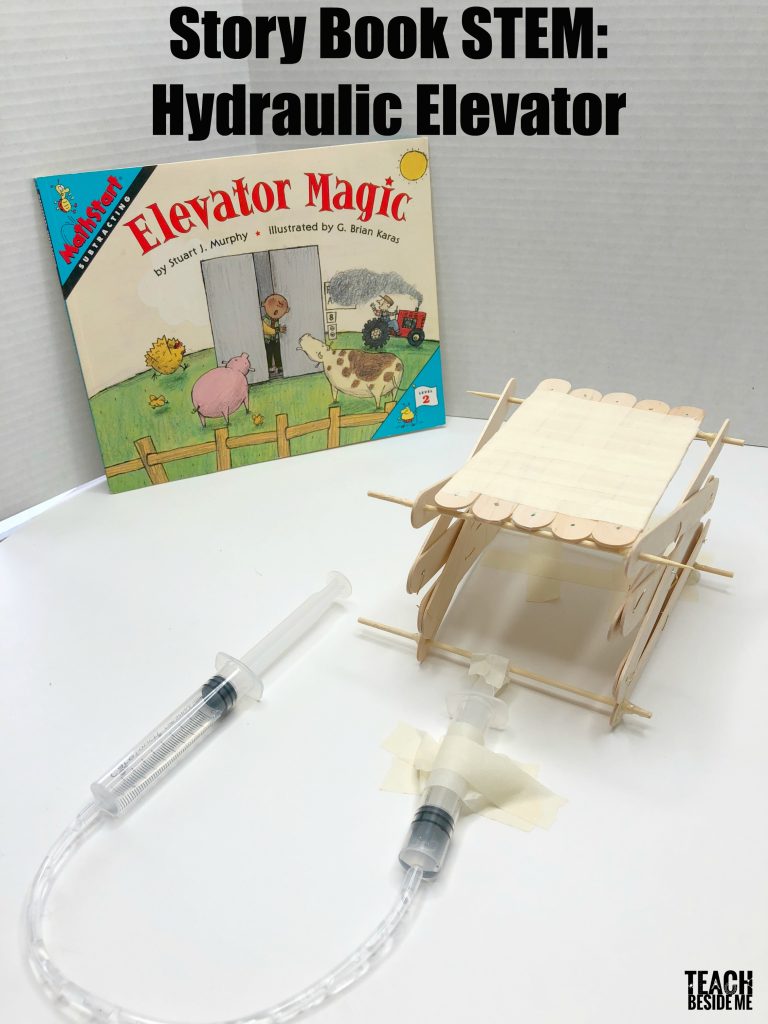
This time, we paired our hydraulic elevator with Elevator Magic by Stuart J. Murphy, a picture book that introduces subtraction through an imaginative elevator ride. It’s a fun combination of science, engineering, literature, and math.
A STEM Project Inspired by Elevator Magic
We paired our hydraulic elevator with Elevator Magic by Stuart J. Murphy, a fun math picture book that introduces subtraction through an imaginative elevator ride.
The book follows a little boy and his mother as they ride an elevator down through a building, stopping at different floors along the way.
It’s a fun connection between reading, math, and engineering. After reading the story, kids can build an elevator of their own and use it to practice addition and subtraction.
You can find more ideas in my book activities for kids collection and my 200+ STEM projects for kids.
How to Make a Hydraulic Elevator
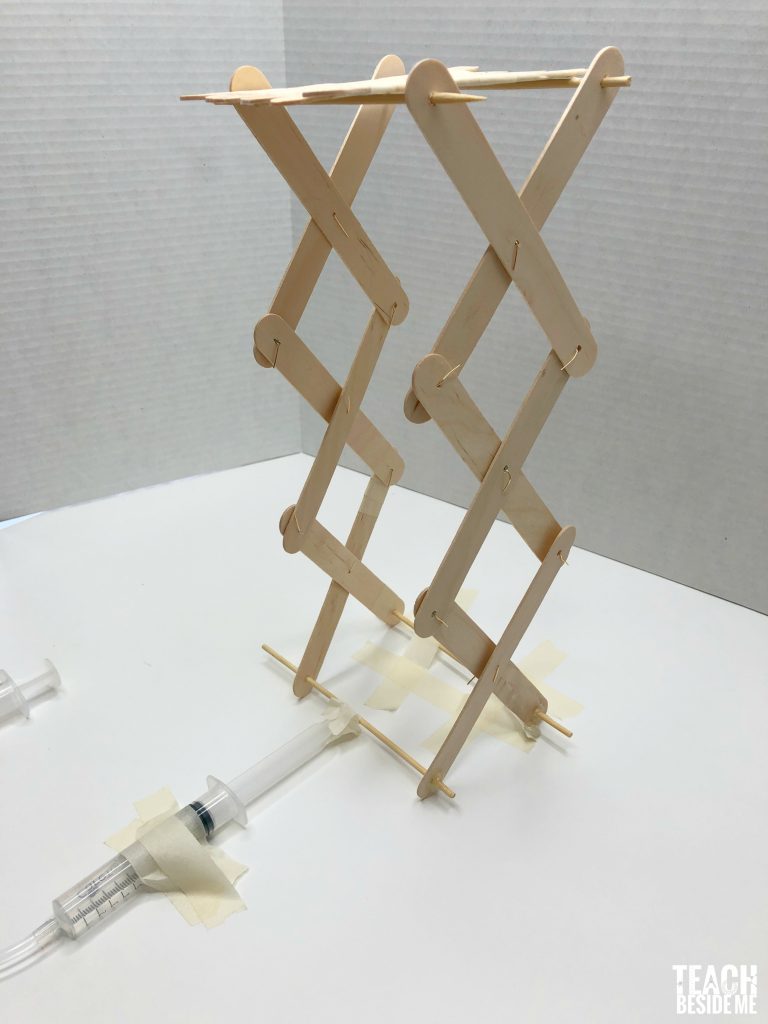
This homemade hydraulic elevator uses a scissor-lift design. The crossed popsicle sticks expand and contract as the hydraulic system moves, raising and lowering the platform.
It’s a more involved STEM project, so younger children will need adult help with construction. Older elementary and middle school students can take a more active role in planning, assembling, and troubleshooting the mechanism.
Hydraulic Elevator Supplies
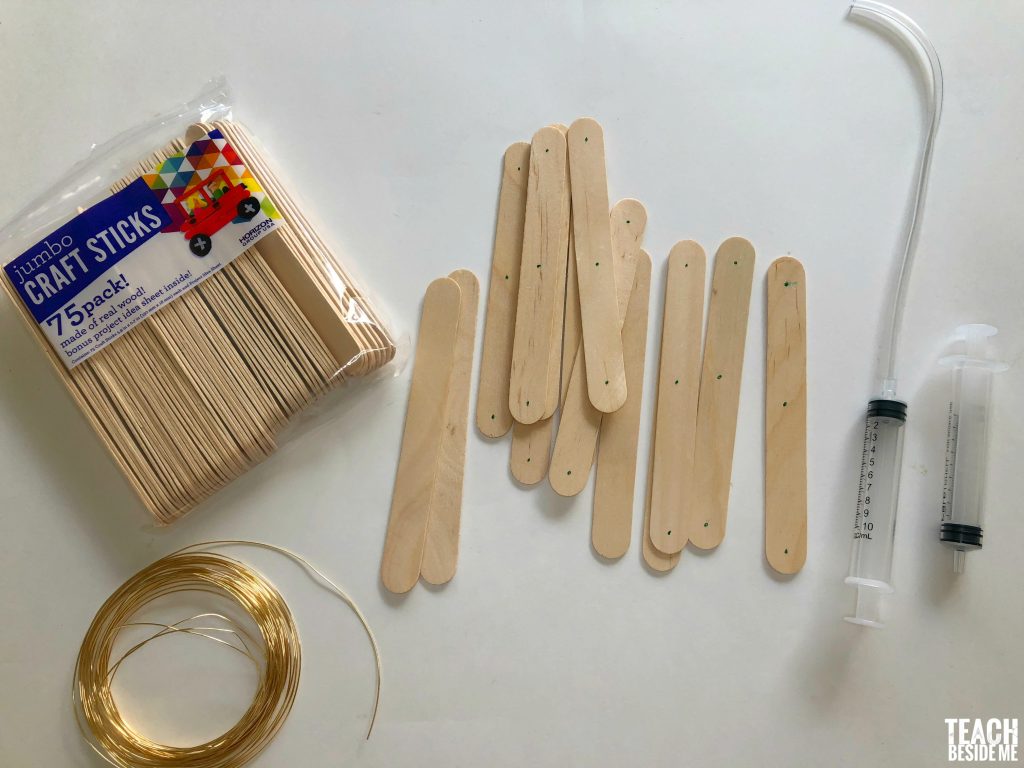
17 Jumbo Popsicle Sticks
Thin wire
Wooden Skewers (2)
2 – 10 ml Syringes
Thin plastic tubing
Hot glue gun
Masking tape
Before you begin: Make sure the tubing fits snugly onto both syringes. Loose connections can leak or allow air into the hydraulic system.
An adult should handle drilling and hot glue. Small drilled pieces and sharp wire ends also require care.
Step 1: Mark and Prepare the Popsicle Sticks
Begin by marking three points on each stick: one in the center and one approximately ½ inch from each end.
Stack the sticks together and secure them with masking tape to keep them aligned.
Carefully drill small holes through the marked points. The holes need to be large enough for the wire or skewers to pass through without splitting the wood.
Tip: Popsicle sticks split easily! Work slowly, and consider drilling through only a few sticks at a time. If a stick splits badly, replace it before assembling the lift.

Step 2: Build the Scissor-Lift Mechanism
Take two popsicle sticks and cross them to form an X.
Connect them through their center holes using a short piece of craft wire. The wire should hold the sticks together while allowing them to pivot.
Repeat until you have three X-shaped pairs.
Next, connect the ends of the X-shaped pairs to form a row of three linked sections.
As you gently pull the ends apart or push them together, the crossed sticks should change angles. This movement is what makes a scissor lift rise and fall.
Important: The moving joints must be able to pivot freely. Don’t glue the center joints or other pivot points rigidly in place.

Step 3: Make the Second Side of the Elevator
Repeat the process to create a second matching scissor-lift assembly using six more popsicle sticks.
You should now have two identical moving sides.
Position them parallel to one another, making sure the joints are aligned.
Use the wooden skewers to connect the two sides at the appropriate top and bottom connection points, as shown in the photos.
The skewers help keep both sides moving together and provide support for the elevator.

Before moving on, gently raise and lower the mechanism by hand.
Both sides should expand and contract together without twisting or binding.
If the elevator gets stuck, check the wire connections. A joint may be too tight, or the sticks may be catching on one another.
A few of my popsicle sticks split during construction, so I reinforced them with masking tape. It wasn’t the prettiest solution, but it worked!
Step 4: Build the Elevator Platform
Arrange five jumbo popsicle sticks side by side to create a flat platform.
Secure them together with masking tape.
Position the platform on top of the lift so that it is supported as the scissor mechanism rises. Make sure the platform doesn’t interfere with the moving joints.
The platform should remain as level as possible as the elevator moves.
Step 5: Secure the Elevator Base
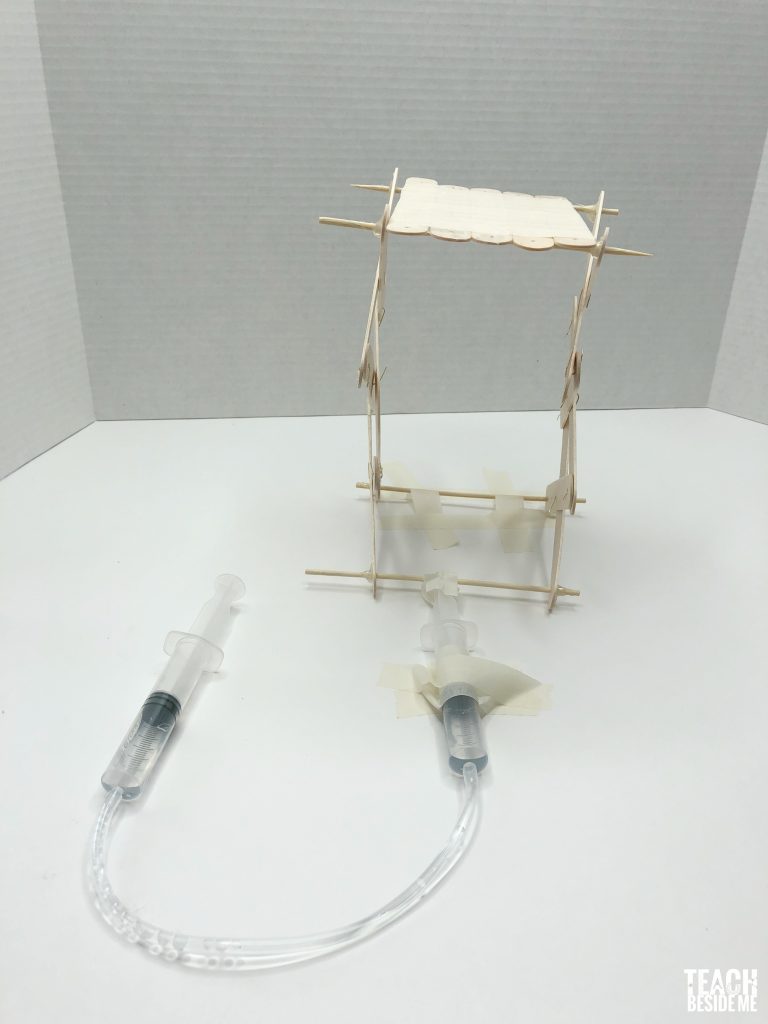
Position the assembled scissor lift on a sturdy, flat work surface.
Secure the appropriate bottom support skewer with masking tape, following the arrangement shown in the photos.
The elevator needs a stable base, but the scissor mechanism must still be free to expand and contract.
Test it again by hand before connecting the hydraulics.
Step 6: Connect the Hydraulic System
Now for the part that makes this elevator so interesting!
The hydraulic system uses two syringes connected by water-filled tubing.
One syringe is the control syringe, which you push and pull. The other is the actuating syringe, which moves the elevator.
To prepare the system:
- Cut a length of tubing that comfortably reaches between the two syringes.
- Fill the tubing and syringes with water, removing as many air bubbles as possible.
- Connect the tubing securely to both syringe tips.
- Gently move the control syringe plunger to check that the second syringe responds.
- Position and secure the actuating syringe so its movement pushes or pulls the appropriate part of the scissor-lift mechanism.
The exact position and attachment of the actuating syringe depend on your elevator’s geometry. Use the original build photos to match the attachment points, and make sure the syringe can move through its required range without bending or jamming.
Why remove air bubbles? Air compresses much more easily than water. Too much trapped air can make the hydraulic movement feel spongy and reduce the effectiveness of the lift.

Step 7: Test Your Hydraulic Elevator!
Now it’s time to try it!
Slowly push and pull the control syringe plunger while watching the elevator.
As water moves through the connected hydraulic system, the actuating syringe changes position and moves the scissor-lift mechanism.
The crossed sticks change angles, raising or lowering the platform.
Try placing a small, lightweight toy on the platform. Can your elevator lift it?
How Does a Hydraulic Elevator Work?
This project combines two engineering ideas: hydraulics and a scissor-lift mechanism.
The Science of Hydraulics
Hydraulic systems use liquid to transmit pressure and force.
When you push the plunger of the control syringe, you increase the pressure in the water inside the connected system.
That pressure is transmitted through the water to the second syringe, causing its plunger to move.
Water is very difficult to compress, which makes it useful for transferring pressure in hydraulic systems.
This is an example of Pascal’s principle: pressure applied to an enclosed fluid is transmitted throughout the fluid.
If the syringes have the same piston area, they transmit approximately equal forces in an ideal system. Different syringe sizes can change the relationship between force and movement distance.
Real hydraulic systems also experience friction and other energy losses.
How the Scissor Lift Works
Look closely at the crossed popsicle sticks.
When the X-shaped sections become taller and narrower, the elevator rises. When they become wider and flatter, the platform lowers.
The linked arms guide the platform’s movement, converting the motion of the hydraulic actuator into vertical lifting.
The same general scissor-lift mechanism is used in equipment such as lifting tables, maintenance platforms, and some construction lifts.
Hydraulic systems are also used in vehicle brakes, hydraulic jacks, and construction machinery.
Hydraulic Elevator Troubleshooting
Engineering projects don’t always work perfectly the first time. That’s part of the learning!
Here are a few things to check if your hydraulic elevator isn’t moving as expected.
The Syringes Move, but the Elevator Doesn’t Lift
Check where the actuating syringe connects to the lift. Its movement needs to change the angles of the scissor arms.
If the attachment point is poorly positioned, the syringe may move without lifting the platform effectively.
Also check whether the lift is too heavy or the mechanism is jammed.
The Elevator Is Difficult to Move
Check all the pivot joints. The wire connections should hold the sticks together without preventing them from rotating.
Look for split wood, overlapping sticks that catch, or skewers that bind against the structure.
Try moving the scissor mechanism by hand with the hydraulic actuator disconnected to identify the problem.
The Hydraulic System Feels Spongy
There may be trapped air inside the tubing or syringes.
Remove the air bubbles and refill the system with water. Check the connections for leaks.
The Elevator Tilts to One Side
Make sure both scissor-lift assemblies are the same size and connected evenly.
Check that the top platform is centered and that the two sides rise together.
The Elevator Won’t Lift a Toy
Start with a lighter object.
The amount of weight the elevator can lift depends on the syringe size, geometry of the scissor mechanism, friction, and strength of the materials.
Don’t force the syringe if the mechanism is stuck. Fix the source of resistance first.
Hydraulic Elevator STEM Challenges
Once your elevator is working, try a few engineering investigations!
Challenge 1: How Much Weight Can It Lift?
Use small objects of known mass, such as coins or washers, as test loads.
Add them gradually to the platform and observe when the elevator can no longer lift reliably.
Record the total mass lifted.
Can you make a design improvement that increases the load your elevator can handle?
Keep the syringe setup and testing procedure the same so you can make a fair comparison.
Challenge 2: Measure the Elevator’s Movement
Use a ruler to measure the height of the elevator platform before and after moving the control syringe.
Measure how far the control syringe plunger travels, too.
How does the movement of the syringe compare with the vertical movement of the platform?
Repeat the experiment at different starting heights.
Challenge 3: Investigate the Scissor-Lift Angles
Observe the X-shaped supports when the elevator is fully lowered, halfway raised, and near its highest position.
Measure or estimate the angles of the arms.
What happens to the elevator’s height as the angles change?
This is a great opportunity to connect geometry and engineering.
Challenge 4: Improve the Design
Can you make the elevator more stable?
Try changing one structural feature at a time, such as adding a brace or reinforcing the platform.
Test the original and improved designs using the same load.
Which design works better, and why?
For more ideas about planning a fair investigation, explore my 105 science fair project ideas.
Turn Your Hydraulic Elevator into a Math Activity
One of the reasons I love this project is that it works beautifully with Elevator Magic.
After reading the book, create a simple building backdrop for your elevator with floors numbered 1–10.
Then use your homemade elevator to practice math!
Try these activities:
- Addition and subtraction: Start with three toy passengers. Add two more. How many are riding now?
- Number sequencing: Move your elevator between numbered floors and identify which numbers come before and after.
- Word problems: Five passengers ride the elevator. Two get off. How many remain?
- Measurement: Measure the height of the platform at different positions and calculate the difference.
- Geometry: Observe the changing angles of the scissor arms as the elevator rises and falls.
The math can be as simple or as challenging as you want to make it.
More Hands-On STEM and Engineering Activities
If your kids enjoyed building this hydraulic elevator, there are so many other ways to explore engineering and physics!
Start with these collections:
- 200+ Elementary STEM Projects — Building challenges, engineering activities, science experiments, and more.
- 20 Elementary STEM Science Projects — Hands-on science activities that encourage experimentation and problem-solving.
- 105 Science Fair Project Ideas — Turn your favorite science activities into investigations with testable questions.
You might also enjoy my Science Art and Drawing Games for Kids book, which combines science concepts with creative activities.

Building a working hydraulic elevator is a wonderful reminder that engineering doesn’t have to begin with expensive equipment. With simple materials, a little patience, and plenty of experimenting, kids can discover some fascinating science.
And watching an elevator you built yourself rise off the table? That’s pretty satisfying!




This is really creative! I will have to save this project so I can try it with my kids on one of our STEM Fridays. Where did you find the syringes and tubing?
I got mine through Amazon- the links are there in the post! 🙂
Hi Karyn,
Could I purchase this item of the HYDRAULIC ELEVATOR from you. My hands are not able to put this together.
Thank you,
Kathy Lincoln
klincoln@sspeterandpaulschool.com
Kathy, I am so sorry, I am not able to do that right now.
I can try?
Very creative Karyn, I’ll try it with my kids today!
Thanks
how do you keep it from leaking? I tried duck tape
I didn’t really have leaking issues. I wonder if your tubing was too big?
Where did you get the tube? And the syringes?
Nice work!!!
Hi, Karyn,
I was wondering if the wire is necessary to connect the popsicle sticks or if it could be substituted? I’m a librarian and sometimes I’m limited in what I can order and use so I’m trying to brainstorm how I could possibly alter this to do with my program kids. Many thanks!
You could maybe try metal brads or twisty ties perhaps?
I used paper clips.
The idea is very good, is there another example for biology. (form Indonesia)
If you had the popsicle sticks pre-drilled, how long do you think it would take you to build on with kids?
Hi, I don’t understand the last step where you attach the syringe to the wooden dowel. How does that raise the elevator?
When you move the dowel in front, it gets closer to the taped down dowel in the back. This is like closing a pair of scissors. The whole tower gets taller and narrower.
Ok, cool! How is this a science fair project though? In ISEF, you need an independent variable, and a dependent variable, this way you can run experiments and test. How do you test this and get data from it?