Hole Punch Art for Kids: A Colorful Craft Using Recycled Paper Dots
This post may contain affiliate links.
Looking for an easy craft that uses supplies you already have at home? This simple hole punch art activity turns ordinary paper dots into colorful works of art while helping kids strengthen important fine motor skills.
If you’ve ever emptied a three-hole punch and wondered what to do with all those little circles, here’s the answer! Instead of tossing them in the trash, use them to create fun pictures, designs, and mosaics.
This recycled paper craft is inexpensive, easy to set up, and perfect for preschoolers and elementary-aged kids.
Why Kids Love Hole Punch Art
This craft is simple enough for young children but creative enough to keep older kids interested.
Kids can:
- Create animals and nature scenes
- Make colorful mosaics
- Practice tracing and following lines
- Experiment with patterns and color combinations
- Turn recycled paper scraps into art
Plus, it’s a fantastic way to sneak in some fine motor practice without it feeling like work.
Benefits of Hole Punch Art
Activities like this help children develop:
- Fine motor skills
- Hand strength
- Pincer grasp
- Hand-eye coordination
- Creativity
- Concentration
Picking up tiny paper dots and placing them carefully on glue lines gives little fingers a great workout!
Supplies Needed
- Paper dots from a three-hole punch
- Three hole punch
- Construction paper or cardstock
- School glue
- Pencil
- Colored paper
How to Make Hole Punch Art
Step 1: Collect Your Paper Dots
Empty the paper circles from your hole punch into a bowl or container.
If you’d like more colors, punch holes from construction paper or scrapbook paper and add them to the collection.
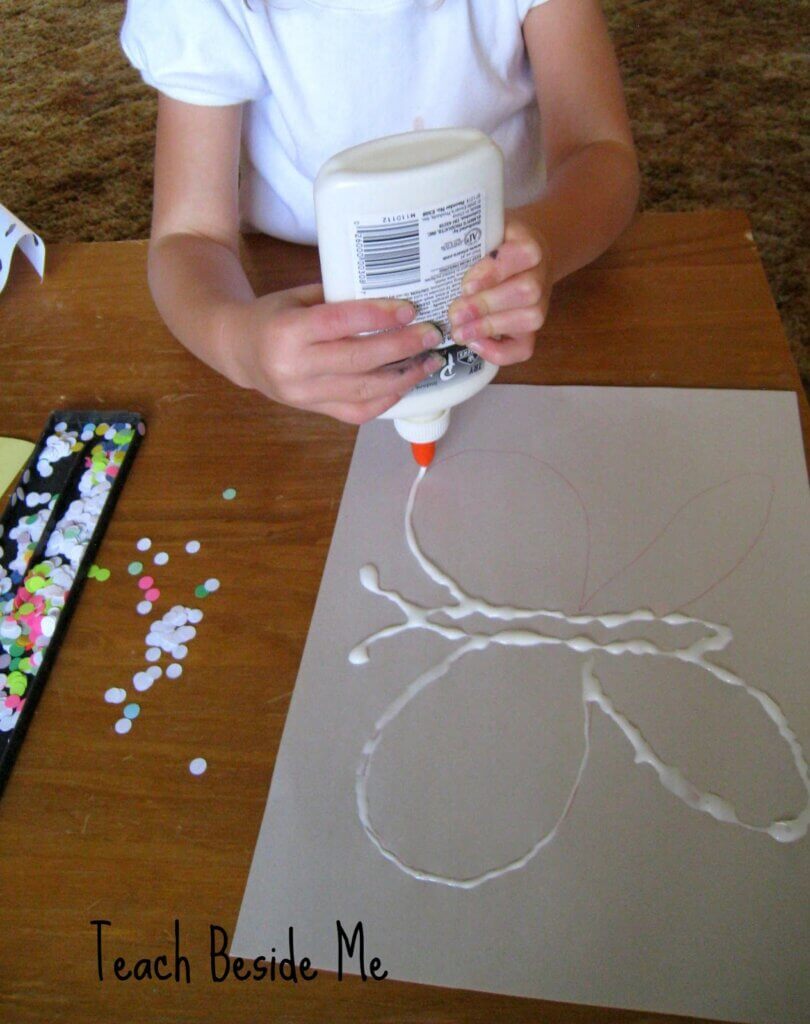
Step 2: Draw a Simple Design
Using a pencil, lightly sketch a picture on a piece of cardstock.
Simple designs work best:
- Butterfly
- Snake
- Flower
- Rainbow
- Fish
- Heart
- Tree

Step 3: Trace with Glue
Have your child carefully trace the pencil lines with a bottle of school glue.
This step is excellent for building hand control and squeezing strength.
Step 4: Add the Paper Dots
Place the paper dots along the glue lines to create the design.
You can:
- Outline the picture
- Fill the entire shape
- Create patterns with different colors
Step 5: Let Dry
Allow the glue to dry completely before displaying the finished artwork.
Our Hole Punch Art Designs
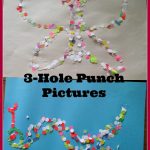
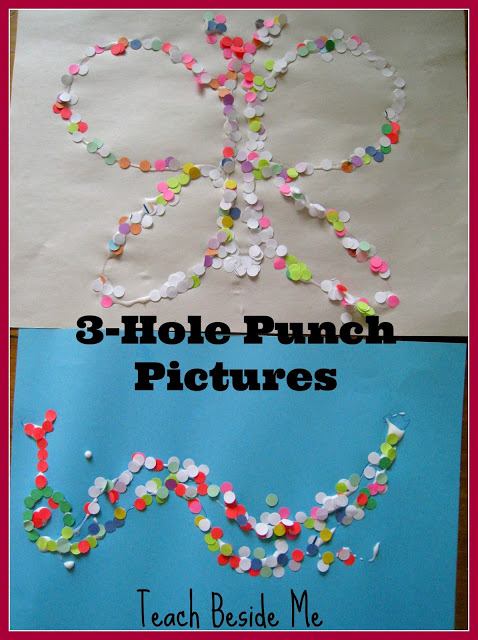
For our project, we created a butterfly and a snake.
The kids loved seeing their drawings come to life with all of the colorful paper circles.
Hole Punch Art Variations
Once kids master the basic technique, try these fun extensions:
Hole Punch Mosaic Art
Fill an entire picture using paper dots instead of simply outlining it.
Alphabet Hole Punch Art
Trace large letters and cover them with paper dots. Perfect for preschool and kindergarten learning.
Name Art
Write your child’s name in bubble letters and decorate it with colorful circles.
Seasonal Hole Punch Art
- Hearts for Valentine’s Day
- Shamrocks for St. Patrick’s Day
- Flowers for spring
- Pumpkins for fall
- Snowflakes for winter
Rainbow Color Sorting
Sort paper dots by color before creating artwork. This adds a simple math and sorting component.
More Easy Crafts for Kids
If you enjoyed this hole punch art activity, try these next:
- Easy Mosaic Craft for Kids
- Rainbow Tie-Dye Suncatchers
- Glue and Salt Spiderweb Craft
- Rainbow Paper Spinner Toy
This simple hole punch art project proves that some of the best kids’ crafts come from materials you already have around the house. Save those paper dots and turn them into colorful works of art!


Cute idea!
Very cute idea!!
So cute!! I did this with different sizes of squares. Lot’s of FUN!!! Happy to have found your Blog today.
In addition to Monday Kid Corner Weekly Linky Party, this week’s theme is WATER. Brush off those archives and link them up at http://thejennyevolution.com/category/linky-parties/monday-kid-corner/ See you there! Jennifer
So pretty, what a great idea! Thanks for sharing at the After SChool Link Party.
Kelly at Little Wonders’ Days
Those are beautiful! What a fun activity:)
These are so cute and turned out so pretty!
Oh this would work well for teaching pointillism
These are super cute! Thanks for sharing at Mom’s Library!
This is like sensory meets art. I love it! What a clever idea that kids of MANY ages would enjoy. Thanks for sharing this at the After School Linky Party!