
Hanukkah STEM Activity: Make a Light-Up Paper Circuit Menorah
This post may contain affiliate links.
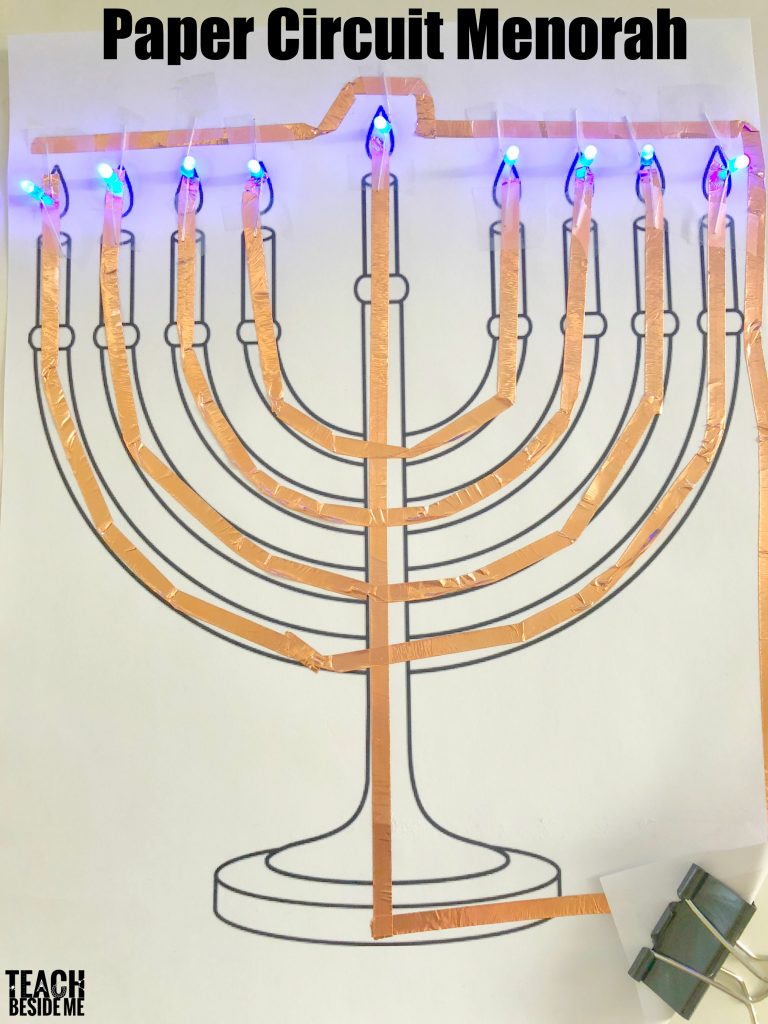
Looking for a creative Hanukkah STEM activity? This light-up paper circuit menorah combines electricity, engineering, and art in a hands-on project for kids!
Using copper tape, LED lights, and a battery, you can create a paper menorah that actually lights up. It’s a fun way to introduce simple electrical circuits while learning about Hanukkah.
I’ve shared plenty of Christmas activities over the years, but I wanted to create something for Hanukkah, too. This paper circuit menorah was so much fun to design, and I was thrilled when my idea actually worked!
While I’m not Jewish, I have a special place in my heart for the Jewish faith because I spent a semester studying abroad in Jerusalem.
That experience was truly life-changing. I learned so much about the beautiful cultures and faith traditions found there. My own faith was deepened as I visited historic and religious sites and learned from local teachers.
I still dream of returning someday with my husband!
I love helping my children learn about different cultures and religious traditions, and this project was one small way to share that interest while exploring science.
What Is a Hanukkah Menorah?
Hanukkah is an eight-day Jewish holiday also known as the Festival of Lights.
A special nine-branched menorah, called a hanukkiah, is used during Hanukkah. Eight lights represent the eight nights of the holiday. The ninth light, called the shamash, is used to light the others. One additional light is lit each night, until all eight are lit on the final night.
Our paper circuit menorah has nine LED lights to represent this tradition.
This is an educational STEM model rather than a traditional ritual menorah, but it’s a creative way to connect a lesson about electricity with learning about Hanukkah.
How Does a Paper Circuit Work?
A paper circuit is an electrical circuit built on paper using conductive materials instead of traditional wires. For this project, we’ll use copper tape to create pathways for electricity.
The circuit includes three main components:
- Battery: Provides electrical energy.
- Copper tape: Creates conductive pathways connecting the components.
- LED lights: Convert electrical energy into light.
For an LED to light, electricity must have a complete path through the circuit.
The positive and negative connections must be arranged correctly. If the circuit has a break, the LED won’t light. If the positive and negative copper tape pathways touch directly, they can create a short circuit.
Because this project uses multiple LED lights connected to shared positive and negative pathways, it introduces the idea of a parallel circuit. In a parallel circuit, each LED has its own connection between the two power pathways.
This is a wonderful opportunity to explore how electricity travels and why different circuit arrangements matter.
Supplies for the Paper Circuit Menorah

You’ll need:
- Free Printable Menorah Paper Circuit Template- Download below!
- One 3V coin cell battery
- Nine small LED lights (3 mm or 5 mm)
- 1/4-inch conductive copper tape
- Clear tape
- One binder clip
- Scissors
- Optional: crayons, markers, or colored pencils
Important safety note: Coin cell batteries can cause life-threatening internal injuries if swallowed. This project requires direct adult supervision and is intended for older children who can safely handle small electronic components. Adults should control the batteries, secure them during use, remove them immediately afterward, and store them away from children. Stop using the circuit if any component becomes hot.
For classroom use, I recommend having students practice with a simple one-light circuit before attempting the full menorah.

How to Make a Paper Circuit Menorah
Step 1: Print the Menorah Template
Begin by printing the free paper circuit menorah template.
Download the Free Paper Circuit Menorah Template
Ready to make your own light-up menorah? I’ve created a free printable Paper Circuit Menorah Template to help you get started!
The template provides the menorah design and circuit layout so you can follow along with the tutorial and build your own glowing Hanukkah STEM project.
Enter your email below, and I’ll send the printable PDF straight to your inbox!
Gather your copper tape, LED lights, and battery, and follow the step-by-step instructions below to bring your menorah to life!
Look at the design before adding any copper tape. You’ll notice that the circuit needs two separate conductive pathways: one positive and one negative.
The LED lights will connect these pathways at the candle flames.
Step 2: Add the Positive Copper Tape Pathway
Start by placing copper tape along the menorah design, following the positive pathway shown in the template. Continue the tape toward the battery connection. Try to keep the tape continuous whenever possible.
If you need to turn a corner, carefully fold the copper tape rather than cutting it. This can help maintain a reliable electrical connection.
If the tape breaks, you’ll need to make sure the overlapping pieces have good conductive contact.
Step 3: Add the Negative Copper Tape Pathway
Next, add the negative copper tape pathway along the opposite side of the circuit. In my design, this pathway travels up the right side of the paper and across the tops of the candle flames.
The positive and negative copper tape pathways must remain separate.
If they touch directly, the electricity can bypass the LEDs, creating a short circuit.

Step 4: Attach the LED Lights
Each LED has two small metal legs, called leads.
On typical new through-hole LEDs:
- The longer leg is positive (+).
- The shorter leg is negative (−).
Gently spread the legs apart so each can touch its corresponding copper tape pathway.
For my original template, the longer positive lead touches the copper tape beneath the flame, while the shorter negative lead touches the upper pathway.
Use clear tape to hold the leads securely against the copper tape. Repeat for the remaining candle flames.
Before attaching all nine LEDs, test one LED with the battery to make sure its polarity and connections are correct.
Step 5: Connect the Battery
The original design uses a folded paper corner as a simple switch.
Place the battery so its positive side touches the copper tape connected to the positive LED leads and its negative side touches the negative pathway.
In my original layout, the positive side of the battery faces down.
Fold the paper corner over to complete the connection, then use the binder clip to hold it in place temporarily. If everything is connected correctly, the LEDs should light.
A note about powering nine LEDs: A single 3V coin cell has limited power. Depending on the LEDs and quality of the connections, some lights may be dim or may not light at all. This project works best as a short demonstration, and you may need to experiment with the circuit or power arrangement to achieve reliable results.
Step 6: Decorate Your Menorah
Once the circuit is working, you can decorate the paper with crayons or markers.
Another option is to place the copper tape on the back of the design and position the LEDs so their lights shine through the candle flames.
This can give the finished project a cleaner appearance while keeping the electrical components mostly hidden.
Troubleshooting Your Paper Circuit
Paper circuits are fun, but sometimes they take a little experimentation to get working! If your LED lights aren’t turning on, check these common problems.
The LED Is Facing the Wrong Direction
LEDs only work when connected with the correct polarity. Make sure the positive lead connects to the positive pathway and the negative lead connects to the negative pathway.
The Copper Tape Has a Break
Check the entire circuit for gaps or loose connections. Copper tape with nonconductive adhesive may not make a reliable electrical connection simply by overlapping two pieces.
Folding the tape at corners or making a conductive bridge can help.
The Positive and Negative Pathways Are Touching
If the two copper tape pathways touch directly, they can create a short circuit. Inspect the design carefully, especially near the LED connections.
The Battery Isn’t Making Good Contact
Make sure both sides of the battery are touching their correct copper tape connections. The folded paper switch needs firm contact to complete the circuit.
Some LEDs Light but Others Don’t
Check the polarity and connections of each individual LED.
Also remember that nine LEDs may require more current than a single coin cell can reliably supply. Different LED colors and types can have different electrical requirements.
If you’re new to paper circuits, try building a simple circuit with one LED first.
More About the Science: Series and Parallel Circuits
One of the most interesting parts of this project is that we’re trying to power several lights from one battery.
There are two common ways to connect multiple electrical components.
Series circuits connect components along a single path. Electricity passes through each component in sequence.
Parallel circuits provide separate branches for components. Each branch connects across the power source.
Our paper circuit menorah uses a parallel arrangement so the LEDs connect between shared positive and negative pathways.
With a 3V coin cell, a parallel arrangement is more suitable than placing nine typical LEDs in series. However, the battery’s limited current capacity can still affect how brightly the lights shine.
Try comparing a one-light circuit with a two-light circuit to see how the brightness changes.
Can You Use This Paper Menorah for All Eight Nights of Hanukkah?
You can use the project to demonstrate the arrangement of the Hanukkah lights. The shamash is the helper light, and an additional light is added each night of Hanukkah.
Traditionally, the lights are arranged from right to left and lit from left to right, beginning with the newest light, using the shamash.
Our paper circuit version doesn’t provide individual switches for each candle, so the lights cannot be controlled separately without modifying the design.
Instead, use the completed model to discuss the tradition or point to the appropriate lights for each night.
Because a coin cell battery has limited capacity, it’s best to illuminate the project briefly rather than leave it running continuously.
Remember to disconnect and remove the battery after each demonstration.
More Paper Circuit STEM Activities
If your kids enjoyed making this light-up menorah, try some of our other creative electricity projects!
Gingerbread House Paper Circuits – Create a festive gingerbread house that lights up using paper circuits.
Origami Firefly Paper Circuits – Combine paper folding with LED lights to make a glowing firefly.
Firefly Soft Circuit – Explore circuits using conductive thread and sewing.
Conductivity Experiment – Test different materials to discover which ones conduct electricity.
I love how paper circuits bring together creativity, engineering, and science. This Hanukkah STEM project was a fun way to explore electricity while learning about a meaningful holiday tradition.
I hope you enjoy making your own light-up paper circuit menorah!





How much copper tape is used for this project? I am trying to determine how much tape is needed for 22 students.
Love this idea but it didn’t work out as planned. 3v lithium batteries didn’t seem to be enough to light up 8 diodes. (Maybe I bought an off brand but these products seem to be standard.) After two nights and about six different attempts (one, two, three different circuits and different menorah formations) I found that some lights would work and some would just flicker and some wouldn’t light up at all. Maybe it’s human error but for the life of me I couldn’t get it to work, so I knew it would be too frustrating to do with children. Would love to see this craft reworked or updated or clarified so that we could try it next year.
you could put two batteries together, that will double the voltage. that might work.
You have to make sure that you have the polarity of the lightbulbs set up correctly. If they don’t light up, turn them 180 degrees and reattach. I figured this out through hours of trial and error! The battery has more than enough power to light the bulbs! Anything more powerful will burn the bulbs out. I know, because I tried a 9V battery, they lit up bright for a moment, and then went out, with a telltale burning smell!
Cannot find the menorah printable. My daughter is really excited to try this with me.
We did it with 7th grade group and it worked great! They made their own design. Straight lines are easier.
Thanks for sharing this