Light-Up Gingerbread House Paper Circuits (Christmas STEM Activity!)
This post may contain affiliate links.
Turn simple paper lunch bags into a glowing gingerbread house village using basic paper circuits! This festive Christmas STEM activity blends creativity, engineering, and circuitry in a kid-friendly way. Each house lights up with a real LED, making it perfect for holiday decorating, STEM clubs, homeschool, or classroom makerspaces.
Kids get to design, build, wire, and illuminate their own gingerbread house—no icing required!
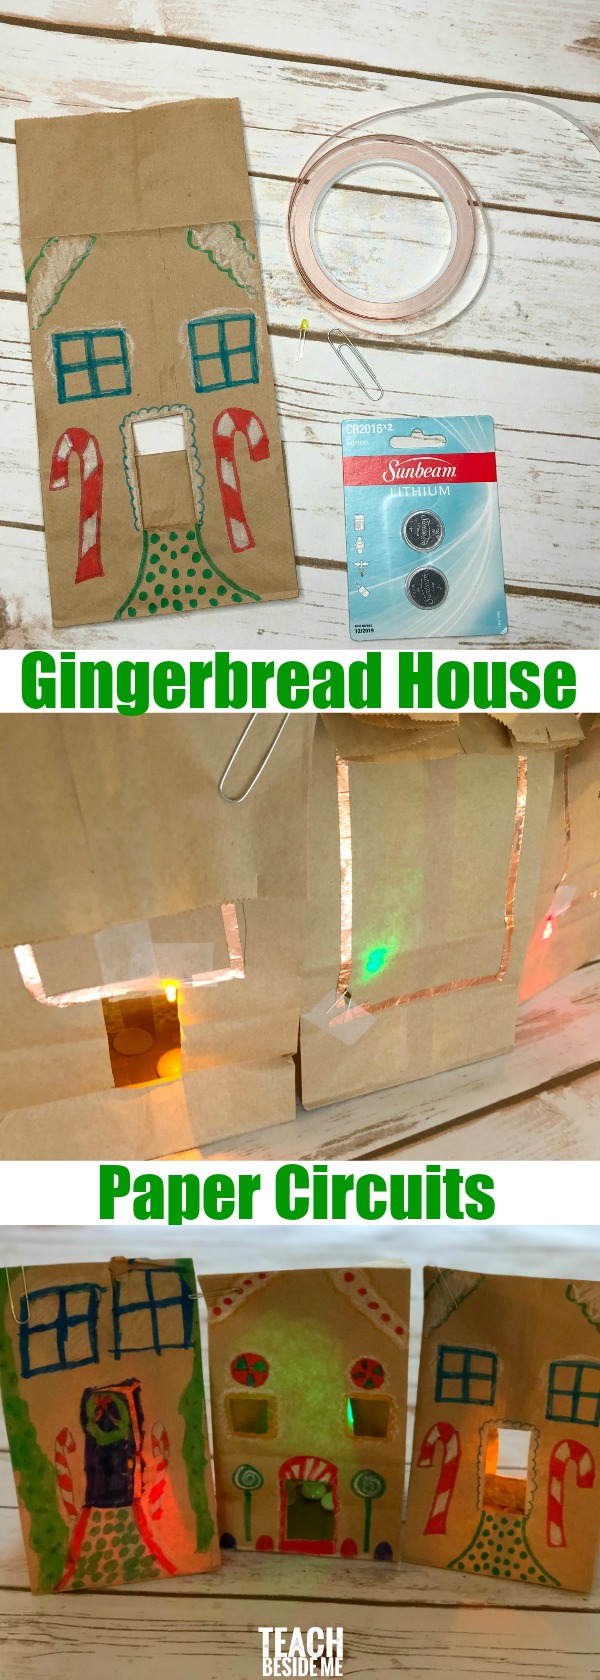
Supplies Needed:
- Lunch Size Paper Bags
- Markers or Crayons to Decorate
- Copper Tape
- LED Lights
- 3 V Lithium coin cell batteries
- Tape
- Paper Clips
- Small Stones or dried beans

How to Make a Light-Up Paper Bag Gingerbread House
1. Decorate your gingerbread house
Draw candy decorations, icing swirls, windows, doors, wreaths—anything you’d put on a gingerbread house.
White crayons or chalk markers look adorable as “frosting.”
Cut out a few windows or a door so the LED light shines through.
Fold the top flap of the bag backward to make room for your circuit.

Build the Paper Circuit on the Back of the Bag
Flip the bag over—this is where you’ll create your simple circuit.
2. Lay down the copper tape (positive path)
Place one piece of copper tape starting at the top left of the bag.
Run it straight down to the bottom left.
Keep it one continuous strip—avoid tearing or overlapping.
This is your positive circuit path.
3. Lay the second copper tape strip (negative path)
Start at the top right of the bag and run a second strip of copper tape down to the bottom.
Turn the corner and run it to the bottom left, leaving a small gap between the two tape paths so they do not touch.
This is your negative circuit path.
Add the LED Light
4. Prepare the LED
The LED has two legs:
-
Long leg = positive (+)
-
Short leg = negative (–)
At the bottom left corner—where your two copper tape paths end—poke a small hole through the bag.
Insert the LED so the bulb is inside the bag and the legs poke out the back.
5. Connect LED legs to the tape
Tape the positive leg (longer leg) onto the left copper strip.
Tape the negative leg onto the right copper strip.
Make sure the metal touches the copper tape directly—no tape between them.

Add the Battery & Complete the Circuit
6. Tape the battery in place
Match the + side of the battery with the + copper tape path and LED leg.
Place the battery near the top of the bag on the back side.
Use a small piece of tape to hold it down—but do not cover the bottom, which needs to touch the copper tape when closed.
7. Turn your gingerbread house “on”
When you fold the bag closed, the flap presses the negative copper tape onto the negative side of the battery, completing the circuit.
Use a paper clip to keep it closed and keep the LED glowing.
Add a few stones or dried beans inside the bag to weigh it down.
Your gingerbread house now lights up!

Build a Whole Gingerbread House Village
Once kids learn the basic circuit, they can:
-
Make multiple houses
-
Add different LED colors
-
Create gingerbread shops, bakeries, and cottages
-
Use glitter glue or puffy paint for icing
-
Cut window shapes so the light glows through
-
String houses along a windowsill, mantle, or classroom shelf
This turns into a magical holiday display!

The Science Behind Paper Circuits
Paper circuits teach kids the basics of electrical engineering in a hands-on way:
-
LEDs only allow electricity to flow in one direction (positive to negative).
-
Copper tape conducts electricity like a wire.
-
A coin cell battery provides the power source.
-
When the copper paths, LED legs, and battery connect properly, electricity flows and the light turns on.
-
If any piece is disconnected, broken, or reversed, the circuit will not work—just like real wiring!
Perfect intro to current, polarity, and conductivity.
Troubleshooting Tips
-
If the LED doesn’t light, try flipping the battery.
-
Check that the LED legs are fully touching the copper tape.
-
Make sure the copper tape is one continuous piece with no gaps.
-
Firmly press all copper tape down—peeling edges interrupt current.
Find More Christmas Learning Ideas:
Christmas Fractions
Christmas Candy Cane Science Experiment (Diffusion Activity for Kids)
Cranberry & Toothpick STEM Engineering: Build 3D Shapes + Floating Challenge
Christmas Tree Spelling
Roll a Gingerbread Man
Poinsettia Ph
Pascal’s Triangle: Christmas Tree Math
Christmas Bell Game
Soft Circuit Christmas Tree
STEAM Kids Christmas Book
12 Days of Christmas Game
Christmas Tree Felt Board


i love love loved this!! thank you so much!
Love this project idea! Will be doing it in 5th grade STEAM. Note that the link to the lithium batteries goes to something else.
So. . . I have been wanting to do this for a few years now and I decided that this was the year. I teach 1st grade and this year my class is small–24. I have learned a few things to prep with my little friends. 1) Figure out in advance where you want to put the circuit, then fold the top of the bag so that the students don’t draw above this line. Do not put the circuit on first because if students make a mistake then the copper circuit is wasted. 2) My students needed a little step by step of how to make a house with the bag so do a model with them and then set them to it. 3) Teach them how to cut out the windows and doors. A few of mine could once I showed them how and then they helped everyone else. 4. Have the class do a whole class activity or gonoodle for a while and then take a small group to put the circuit together. I did the copper circuit after school on each finished bag. Then the next day, I showed the small groups how to put in the lightbulb and put it on the copper wire–they did this themselves. They opened the battery. To tape the battery I made a tape donut of the copper wire and it holds fine, this is also a good idea to help move the battery in place if needed. Then we folded the bag and paper clipped it. This did take 2 1/2 sessions to complete (making the house, and adding the circuit–total an 1 hour and 30 min. max.–not including the putting on the circuit after school). Would I do it again? Yes. Definitely! Why? because this is a very forgiving, cool project. The copper wire is not as difficult to work with as I thought. If the circuit wasn’t long enough or in the right place I just added more copper tape and carefully moved it over. No big deal. Also, I had students want to add extra winter details after their house was made and it didn’t harm the circuit at all.They used crayons and markers. I did this by myself with my students. Yes, extra adult hands would have been wonderful, but there are not that many parent volunteers at my school. So, if you are thinking that you would never do this with a young class, I hope this helps you.
love it
Thank you!
About how long would the “houses” stay lit?