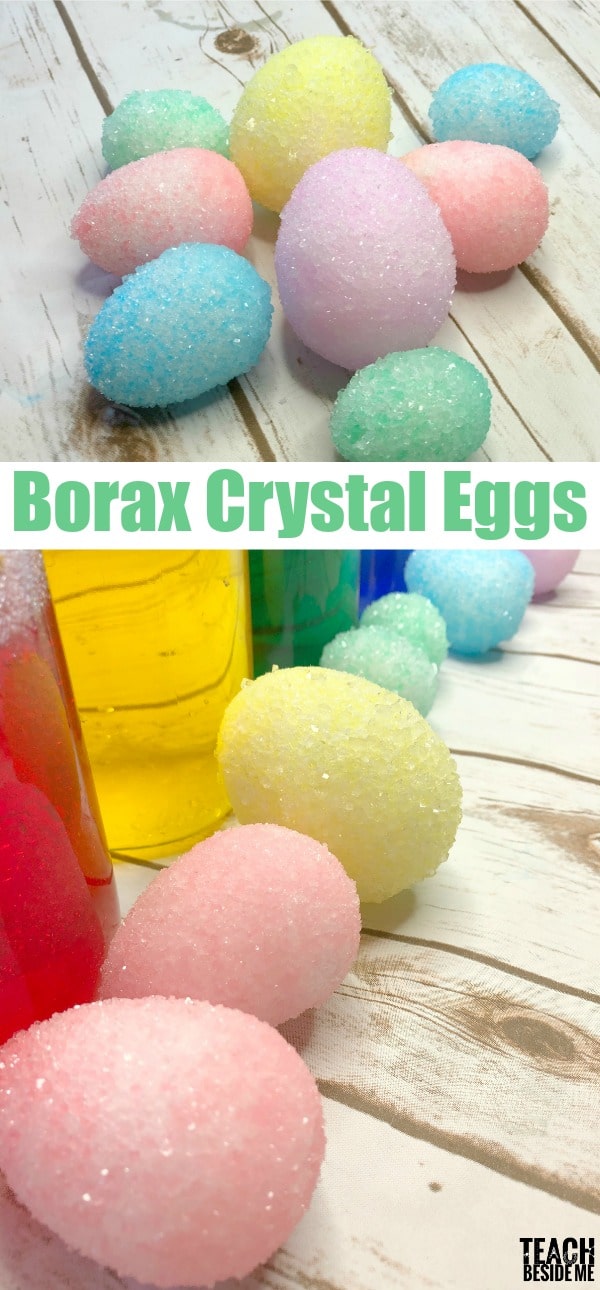
Easter Science: Borax Crystal Eggs
This post may contain affiliate links.
Looking for a dazzling science experiment to celebrate Easter or Spring? Try making Borax Crystal Eggs! This hands-on Easter science activity is perfect for kids of all ages and a fun way to mix STEM learning with seasonal creativity. Watch as beautiful crystals form on egg-shaped bases—like magic!
Whether you’re teaching at home or in the classroom, this activity is a great way to explore chemistry, saturation, and crystal formation while enjoying the wonder of Easter-themed fun.
(See more of my STEM projects HERE.)
What Kids Learn from Borax Crystal Eggs
-
How crystals form from a saturated solution
-
The role of temperature in solubility
-
Observation and patience through slow science
-
Creativity through color and shape selection
-
Hands-on chemistry and physical science concepts

Supplies You’ll Need
-
Egg-Shaped Styrofoam (or any shape!)
-
Two wide-mouth jars: 1 quart jar and 1 smaller jelly jar
-
Wire or large paper clips (to suspend the egg)
-
Hot water
-
Liquid watercolors or food coloring (optional)
-
Marbles or small rocks (to weigh down smaller jar)
Watch it in Action!
How to Make Borax Crystal Eggs
These crystals really are easy to make and using a shape to start with makes them more interesting, I think!

How to Make Borax Crystal Eggs – Step-by-Step
1. Prepare the Borax Solution
-
Fill your wide-mouth quart jar about 2/3 full with very hot water.
-
Stir in 1/4 to 1/3 cup of Borax powder until fully dissolved.
-
Add a few drops of liquid watercolors or food coloring if desired. The tint will be light and pastel—perfect for spring!
TIP: The more Borax you use, the better the crystals will grow.

Prepare the Egg
-
Carefully push a thick wire or jumbo paper clip through the Styrofoam egg lengthwise.
-
Bend the bottom of the wire to secure the egg so it won’t slip off.
-
Bend the top end to form a hook that can hang on the rim of the jar.

Submerge the Egg
Hang the egg in the Borax solution so it is fully submerged but not touching the bottom.

Since Styrofoam floats, place a smaller jelly jar on top of the egg to weigh it down. Fill the jelly jar with marbles or small rocks to keep it steady.

Let Crystals Grow
-
Leave the egg submerged in the solution for 24–48 hours. Crystals will begin forming on the surface of the Styrofoam.
-
Carefully remove the egg and let it dry on a paper towel.
-
Gently remove the wire—any crystals stuck to it should flake off easily.
- If no crystals form, reheat the solution, add more Borax, and try again.

The kids and I loved how they turned out! Once you pull them out of the water, it will be wet & messy. Let the eggs dry for a bit before letting the kids handle them.

Pull out the wire gently!

The blue ones were my favorite!
Science Behind the Crystals
Borax crystals form through a process called crystallization. When you dissolve Borax in hot water, the solution becomes saturated—meaning it can’t hold any more dissolved material. As the solution cools, the Borax comes out of the solution and begins to crystallize on surfaces like the Styrofoam egg. The result? Gorgeous geometric crystal patterns!
This is a great introduction to:
-
Solubility
-
Saturation
-
Temperature and its effects on chemical reactions
-
Molecular structure and crystal formation
Make It Your Own!
-
Try different shapes like stars or hearts!
-
Use white eggs and color them after crystals form with watercolor paints.
-
Add glitter to the Borax solution for a sparkly twist.
-
Compare eggs made with varying amounts of Borax to observe different crystal sizes.
Extend the Learning
Pair this activity with a weather or water unit, or during an Easter-themed science week. It’s a perfect crossover into:
-
Spring science
-
Chemistry and earth sciences
-
Sensory exploration
- Tie in a book! We read The Easter Egg by Jan Brett.
- Try these Easter Egg Volcanoes
More Egg-Inspired Activities from Fellow Bloggers
Check out these other fun and educational egg-themed ideas:
Number Recognition Counting Egg Tray by JDaniel4’s Mom
Easy Fine Motor Skills Easter Egg Craft for Kids – School Time Snippets


Do you think this could work on hard boiled eggs as well, in the she’ll like traditional egg dying?
You can do it with eggshells, but I am not sure about the whole egg. It would not be edible if you did it because borax is not safe to eat and would soak through the shell most likely.