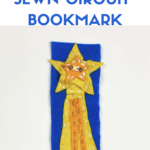
Sewn Circuit Bookmark
This post may contain affiliate links.
Today I want to show you how to make a sewn circuit bookmark, also called soft circuits. These are such a fun activity that teaches several concepts.

Did you know there are threads that conduct electricity? The thread used in this project is made of metal that allows electricity to pass through it just like a wire. Think of all of the cool things you can make! See also my Sewn Circuit Christmas Ornament, as well as my Firefly Sewn Circuit.
In this activity you will learn how to sew a bookmark that lights up. You’ll learn about electricity, conductivity, and circuits in the process. Use your creativity and make your own design! See more Science Art Activities HERE!
Supplies for the Sewn Circuit Bookmark

Felt or other fabric in a few colors
Embroidery thread
Needle

Conductive thread
Coin cell battery
Sewable battery holder
Sewable LED lights
How to Make the Sewn Circuit Bookmark
Decide on your sewn circuit bookmark design and cut your shapes out of fabric. Cut out a long strip for the bookmark.
Using the embroidery thread, sew your design onto the bookmark piece. As you can see, I made a shooting star! You could also use fabric glue for a little less sewing.

Lay out where you want the lights and the battery pack to go.

Use the conductive thread to sew from the lights to the battery pack. Make sure to match up the positive side and negative side of the lights and the battery. After sewing a running stitch up one side, cut your thread and tie a knot with the end of the loose thread before you sew the next one. You do not want the threads of the positive and negative sides connected or touching. If they do, the light will not work.

If you want to cover your battery, use another piece of felt and sew it over the top. Be sure to leave an open space to turn it on and off and to change the battery as needed.
For the this bookmark design, the light sewn onto the star had to have another piece of felt behind it before laying it on top of the battery due to the conductive thread on the back side. The knots of thread on the back touched the battery and caused the light to not work. Just put this piece on behind the star before sewing the star on to your bookmark.
Light up your design!

Troubleshooting tips:
If you are having trouble lighting up your sewn circuit bookmark, here are a few things to check. Make sure your battery and lights are both working by testing them before attaching them! Make sure no conductive threads are crossed. Make sure your negatives and positives are matching. Check to see that your battery is inserted the correct way matching the negative and positive sides.
Just a warning, this has a lot of small parts and is not suitable for young children.
Want More Electricity & Circuit Activities? Check these out:
Science Art: Conductive Paint Circuits
Building Electric Circuits: STEM Challenge Cards
Origami Firefly Paper Circuits
Is It Conductive or Not? STEM Conductivity Experiment
Also be sure to check out my Science Art book full of activities that bring together science and art!
![]()