Halloween STEM~ Paper Circuits
This post may contain affiliate links.
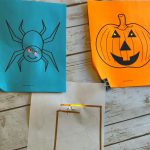
It’s always fun to do a little bit of holiday learning and today I have a Halloween STEM activity to share with you. These cute halloween paper circuits are simple to make. This is a simple electronic circuit that even kids can create! My 7-year-old could follow along and make it! We made a jack-o-lantern, a spider and a ghost with glowing eyes. (See also my Conductive Paint Circuits!)

How to Make the Halloween Paper Circuits:
Supplies: (Can be found online or in hardware stores)
Lithium 3V Coin Cell Batteries
3 or 5 mm LED Lights
1/4″ Conductive Copper Tape – a conductive adhesive
Binder Clips
Halloween Templates
Print out the Halloween Paper Circuits Templates Here!
(You could also draw your own templates on any printer paper or construction paper.)
You can print them on colored paper, or color the pictures first.
We started by poking holes in the eyes with our lights so that when the paper is turned over you can see where the eyes will be easily.

Fold back the bottom corner of the paper. Use the copper tape, peel off the backing and starting from the fold, make a straight line to the left. Angle upwards towards where the eyes are. Do one more turn coming across under the eyes. It needs to be close enough for the pins or legs of the led lights to reach. It also needs to be a continuous strip of copper tape. If it tears, you can overlap pieces.
We are making a simple circuit template for our electrical connection.
The second section of tape should not touch the first. Make a second line going across above the first for the other side of the lites. Turn downward and end right in the fold that you made on the corner of the paper. If your tape breaks, you can add a small piece overlapping the other piece.
One section will be positive and one will be negative. This will be determined by the direction you put your lights. The pins on the lights are two different lengths. The short ones are the negative side and the long ones are the positive side. Add your lights into the holes you made at the start. Bend the pins so that they are touching the two sides of the tape. Make sure both pins are facing the same direction. We bent the long ones (positive) to the bottom and the short ones to the top.

Now we will attach our power source, the battery. When you add your battery, match the positive side of the battery to the positive leg on your pins. Sometimes the lights will flicker a bit. Usually this is due to how tightly they are connected to the strips of copper tape. I always add an extra strip of copper tape over the top of the pins to keep them steady. Then secure your battery with a paper clip or a binder clip.
We also like to use some scotch tape to hold the LED legs in place after it is completed.
Remember that these batteries are a choking hazard, so always use caution around younger kids!

Not too hard, right? This is a fabulous technology STEM activity to try in class or at home this week!

Now for a little more information about these circuits and how they work:
LED stands for Light Emitting Diode. It is a semiconductor device that emits light when a current flows through it.
Open Circuit- This occurs when an electrical path has been opened or interrupted. If the pieces are not all attached, or there is a gap in the copper tape, it will create an open circuit.
Closed Circuit- This is a circuit with a continuous path allowing the electrical current to flow.
We have done some other circuit activities in the past. Check out our Menorah Paper Circuits, Firefly Paper Circuits, and Play dough circuits! See the Is It Conductive or Not? STEM Conductivity Experiment . We’ve also done some fabric sewn circuits!
Also Check Out These Halloween Activities:
Twirligig Pumpkin Paper Spinner Toy


Love the Halloween circuit STEM project but can’t find the templates, Help….